
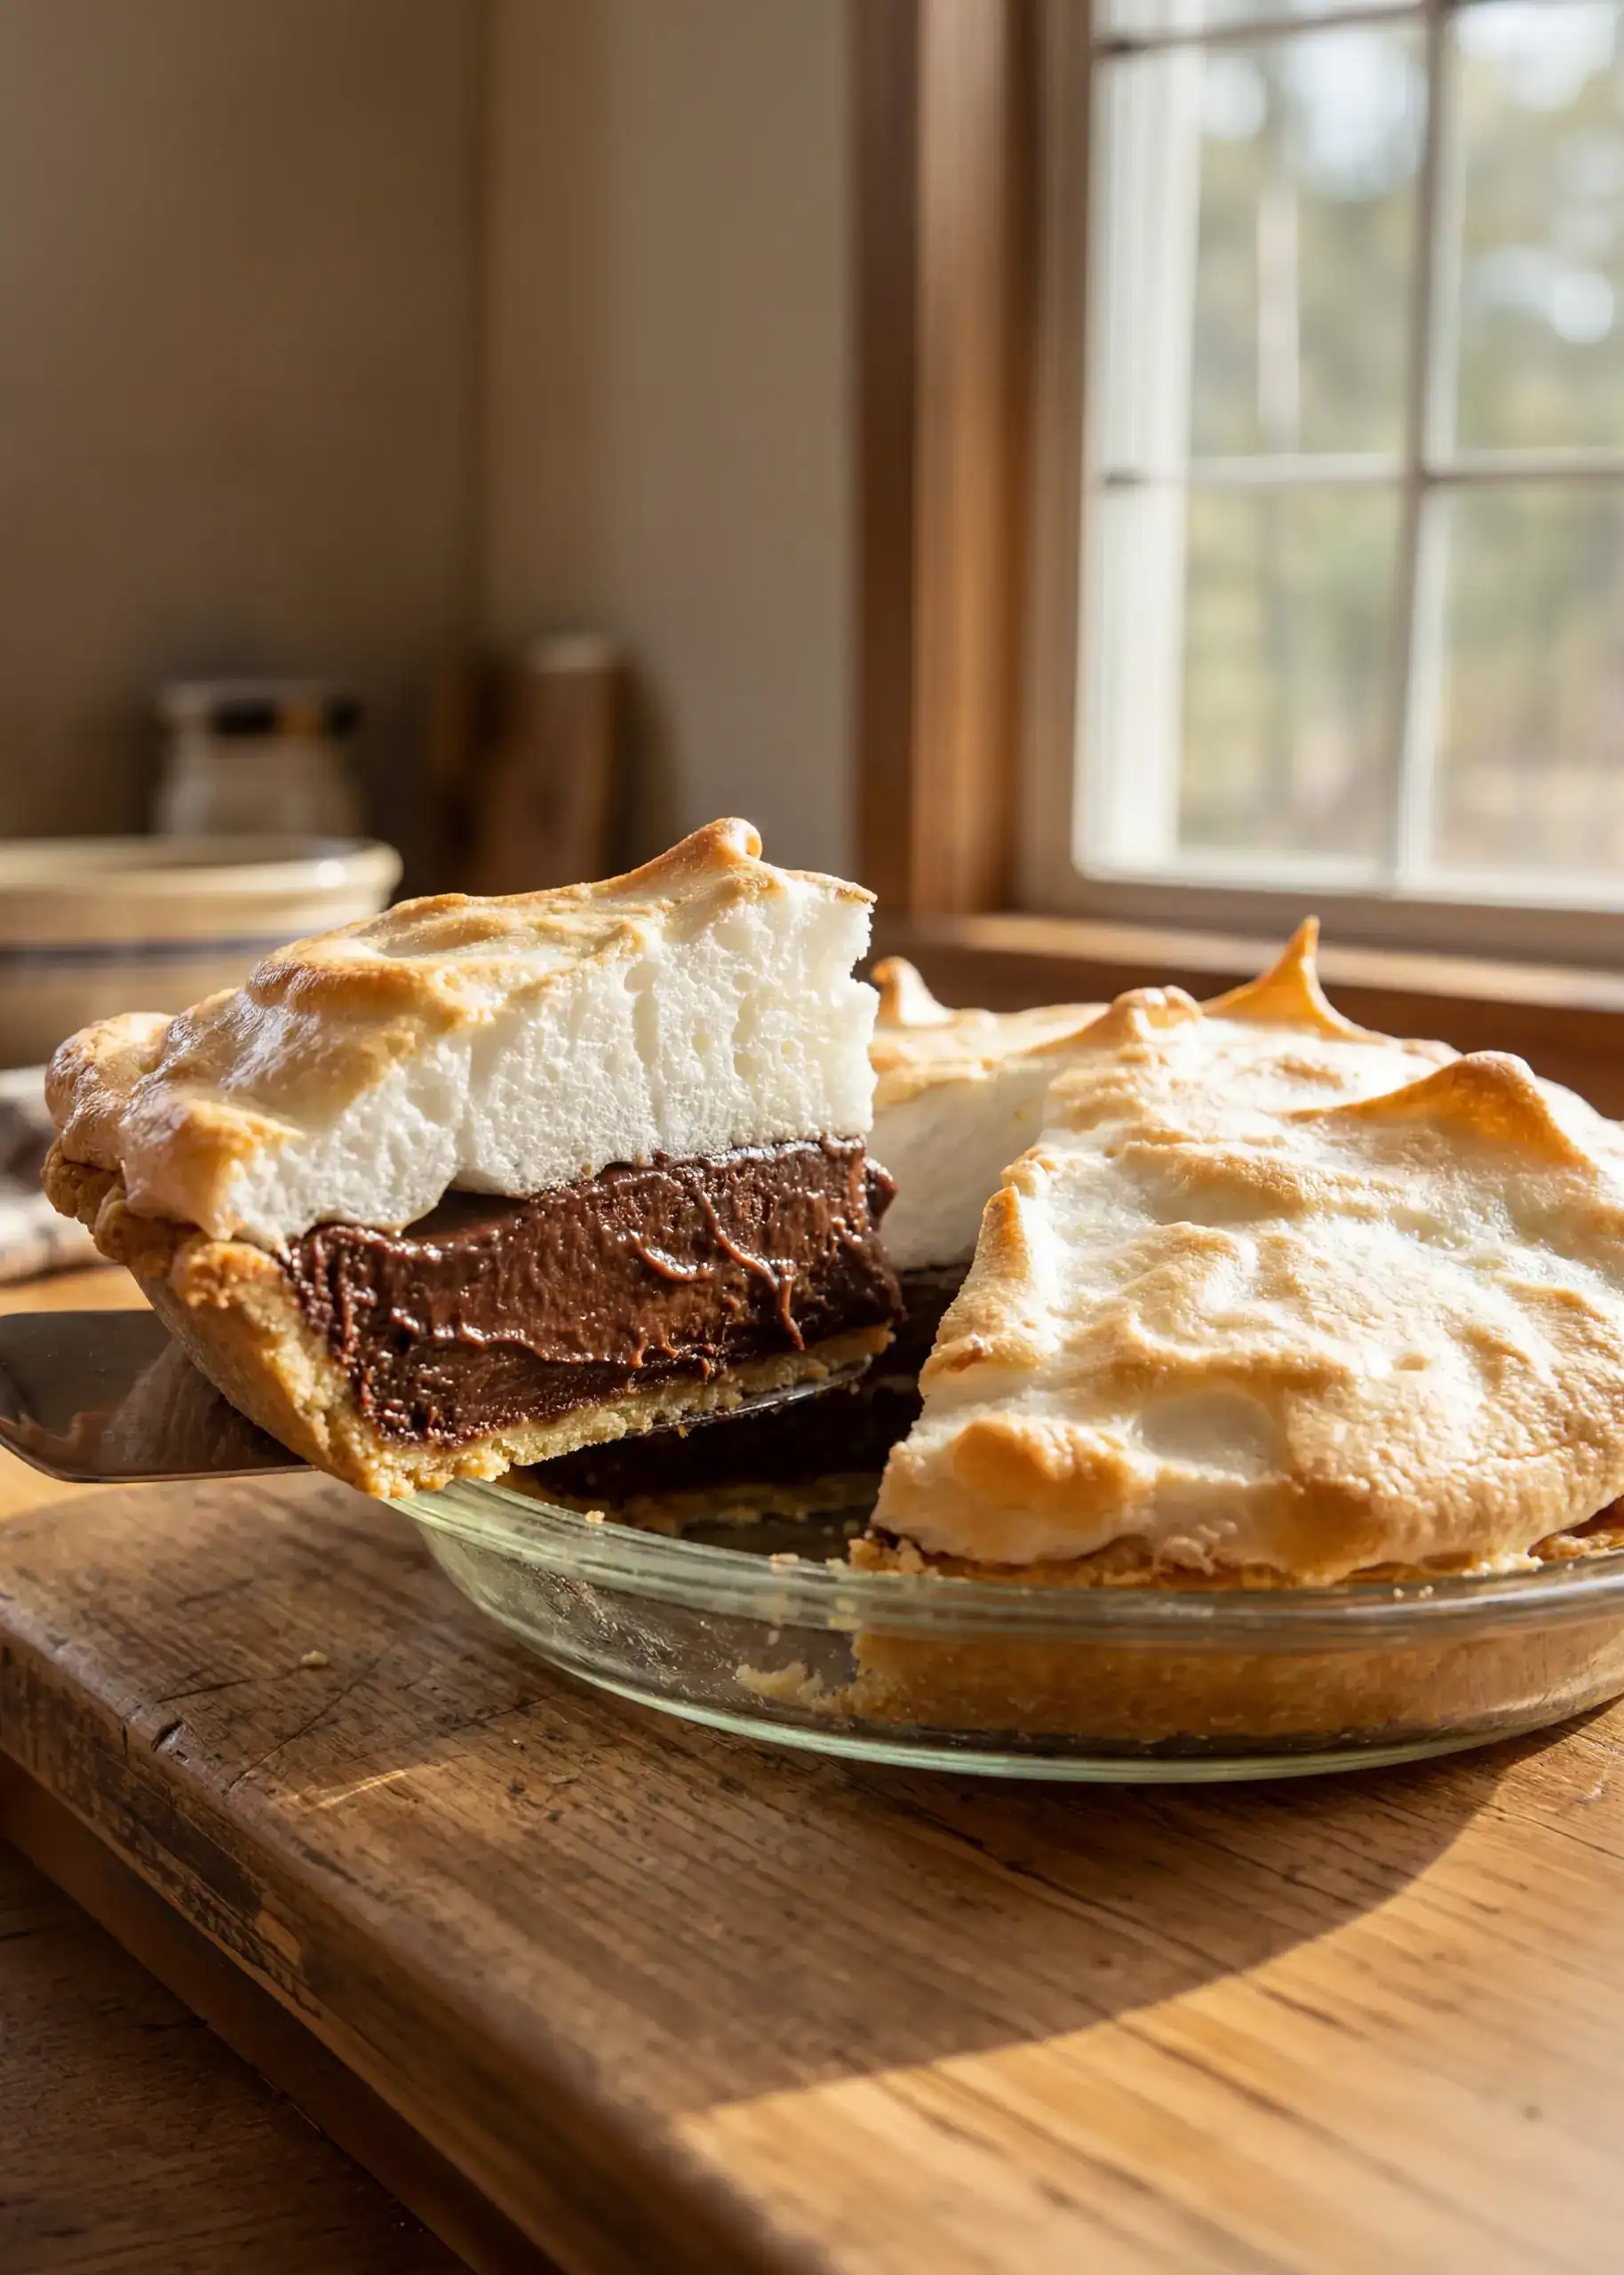
Chocolate Pie
This is one of my all-time favorites. It is delicious, creamy, and probably just like your grandma used to make. While the traditional way is to cook the filling on the stovetop, I have a new little trick to make it easier and more fail-proof: we are going to cook it in the microwave.
Old Fashioned Chocolate Pie (with a Modern Twist!)
Do you have a cookbook that looks like mine? It’s got lots of splatters, and I’ve even got some notes where I tweaked a recipe here or there. That is the sign of a good cookbook with recipes that are well-loved.
Today, we are making one of those favorites: an Old Fashioned Chocolate Pie. It is a delicious, creamy dessert that is probably just like the one your grandma used to make. While I don’t make it often, it is one of my all-time favorites.
Traditionally, this filling is cooked on the stovetop. However, I have a new little trick to make it a bit easier and more fail-proof: we are going to make the filling in the microwave. It tastes just as old-fashioned, but it saves you some of the hassle.
Let’s get baking!
The Recipe
Ingredients
The Crust
- 1 Pie crust: You can use store-bought or homemade. (Note: If you want to make your own, I have a separate video for a delicious homemade crust ).
The Meringue
- 3 to 4 Egg whites: Use 3 if you have large eggs, or 4 if your eggs are smaller or you want a taller meringue.
- 1/4 cup Granulated sugar.
- 1/4 tsp Cream of tartar.
The Filling
- 1 1/2 cups Sugar.
- 3/4 cup Flour: All-purpose or self-rising will both work.
- 1/2 cup Cocoa powder.
- Pinch of Salt: Just enough to cut the sweetness.
- 3 to 4 Egg yolks: Reserved from separating your eggs.
- 2 1/2 cups Milk.
- 1 tbsp Butter: Just under a tablespoon is fine, or go up to a full tablespoon for richness.
- 1 to 2 tsp Vanilla extract.
Instructions
1. Prepare the Crust
- Preheat your oven to 425°F.
- Place your unbaked pie crust into the pie plate and flute the edges with your fingers to create a pretty design.
- Important Step: Poke holes in the bottom and sides of the crust with a fork. This prevents air bubbles and keeps the pastry from puffing up while it bakes.
- Chill the crust in the fridge for 30 minutes or briefly in the freezer to keep it cold.
- Bake the empty crust for about 10 minutes until it starts to get a good golden brown. Set it aside to cool.
2. Make the Meringue
- Separate your eggs carefully. Put the whites in a mixing bowl and keep the yolks for the filling. Tip: Ensure absolutely no yolk gets into the whites, or the meringue won’t fluff up.
- Using a whisk attachment, beat the egg whites on medium speed until frothy.
- Once frothy, turn the speed up and slowly sprinkle in the 1/4 cup sugar and add the 1/4 tsp cream of tartar.
- Whip until stiff peaks form. When you pull the whisk out, the peak should stand up straight and not flop over.
3. Make the Filling (Microwave Method)
- In a microwave-safe glass bowl, whisk together the sugar, flour, cocoa powder, and salt. Whisking helps break up lumps in the flour.
- In a separate container, whisk the egg yolks into the milk.
- Pour the milk mixture into the dry ingredients and whisk until combined.
- Cook in intervals: Microwave for 2 minutes, then remove and stir well.
- Microwave for another 1.5 to 2 minutes and stir again. It may look lumpy, but trust the process—keep whisking and it will smooth out.
- Continue in 30-second intervals until the mixture is thick and pudding-like.
- Once thickened, whisk in the butter and vanilla until the butter melts into the hot filling.
4. Assemble and Finish
- Lower the oven temperature to 350°F.
- Pour the hot filling directly into the baked pie shell.
- Top immediately with the meringue. Spread the meringue all the way to the edges so it touches the crust to seal it. Use your spatula to swirl it and create pretty peaks.
- Bake for 5 to 10 minutes (check it around 7 minutes) until the meringue is golden brown to your preference.
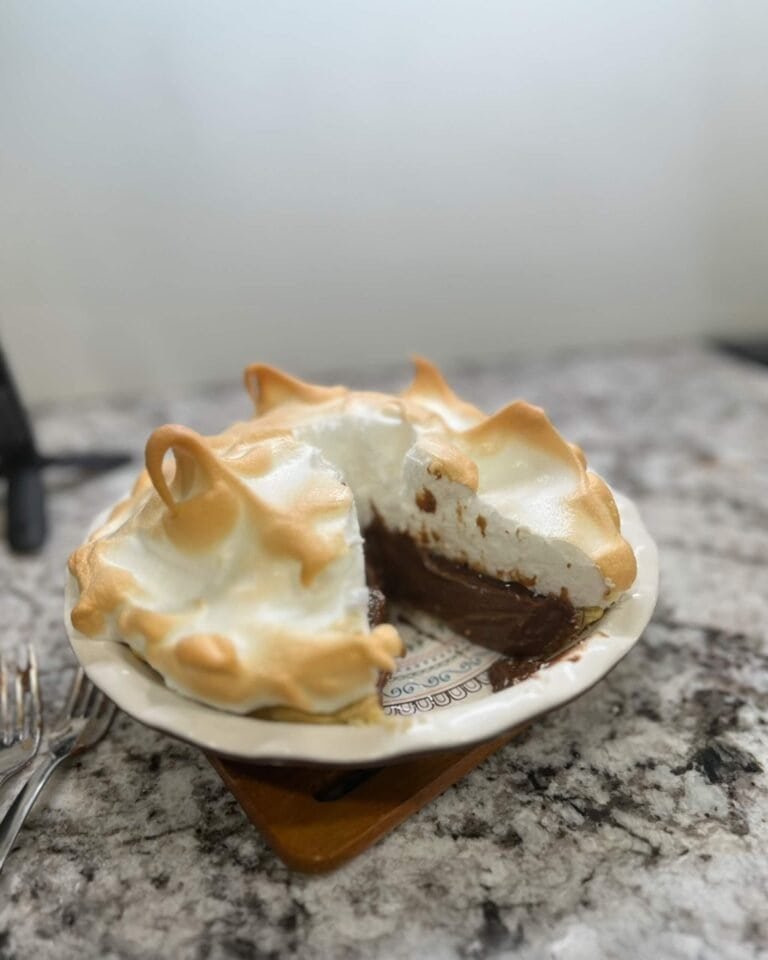
- The Hardest Part: Let the pie cool for 1 to 2 hours. The filling needs this time to set up so you can slice it perfectly.
Tips & FAQ
Why cook the filling in the microwave? Chocolate pie filling can be finicky on the stovetop. Sometimes it sets up perfectly, and other times it doesn’t, even if you didn’t do anything different. The microwave method helps remove that inconsistency and makes it a little more fail-proof.
Can I use a store-bought crust? Absolutely. You can decide if you want to use store-bought or homemade. Just make sure you bake it first because the filling is cooked separately.
My meringue didn’t fluff up. What happened? You likely got a tiny bit of egg yolk in your egg whites. It is very important to separate them carefully; even a small amount of yolk will prevent the meringue from fluffing up nicely.
Do I really have to wait an hour to eat it? Yes! Even though the filling thickens in the microwave, it is still a bit jiggly when it comes out. As it cools, it finishes setting up. If you cut it too soon, it won’t hold its shape. It stays together perfectly once it has cooled for an hour or two.
How do I keep the meringue from shrinking away from the edges? When you spread the meringue on top of the filling, make sure you spread it all the way until it touches the crust. This anchors the meringue and helps prevent it from pulling away.
Old Fashioned Chocolate Pie
Ingredients
The Crust
- 1 Pie crust store-bought or homemade, unbaked
The Meringue
- 3 to 4 Egg whites use 4 for a taller meringue
- 1/4 cup Granulated sugar
- 1/4 tsp Cream of tartar
The Filling
- 1 1/2 cups Sugar
- 3/4 cup Flour all-purpose or self-rising
- 1/2 cup Cocoa powder
- Pinch of Salt
- 3 to 4 Egg yolks reserved from separating eggs
- 2 1/2 cups Milk
- 1 tbsp Butter approximate, just under a tablespoon is fine
- 1 to 2 tsp Vanilla extract
Instructions
Prepare the Crust
- Preheat your oven to 425°F.
- Place your dough into the pie plate. Flute the edges using your fingers to create a design if desired.
- Prick holes in the bottom and sides of the crust with a fork. This prevents air bubbles and keeps the pastry from puffing up too much.
- Chill the crust in the fridge for 30 minutes or briefly in the freezer while you prep ingredients.
- Bake the empty crust for about 10 minutes until golden brown. Set aside.
Make the Meringue
- Separate your eggs, placing whites in a mixing bowl and reserving yolks for the filling. Be very careful not to get any yolk in the whites.
- Using a whisk attachment, beat egg whites on medium speed until frothy.
- Increase speed and slowly sprinkle in the sugar and add the cream of tartar.
- Continue whipping until stiff peaks form and stay put when you lift the whisk. Set aside.
Make the Filling (Microwave Method)
- In a large microwave-safe glass bowl, whisk together the dry ingredients: sugar, flour, cocoa powder, and salt.
- In a separate container, whisk the egg yolks slightly and mix them into the milk.
- Pour the milk and egg mixture into the dry ingredients and whisk until combined.
- Microwave the mixture in intervals to cook it. Start with 2 minutes, then remove and whisk thoroughly.
- Microwave for another 1.5 to 2 minutes, then whisk again. It will look lumpy at first, but keep whisking and it will smooth out.
- Continue in short 30-second intervals if needed until the mixture is thickened like a pudding.
- Once thickened, whisk in the butter and vanilla until melted and combined.
Assembly
- Lower the oven temperature to 350°F.
- Pour the hot chocolate filling directly into the baked pie shell.
- Immediately top with the meringue. Spread it all the way to the edges so it touches the crust (this helps seal it). Use your spatula to create decorative peaks.
- Bake for 5 to 10 minutes (check at 7 or 8 minutes) until the meringue is browned to your liking.
- Let the pie cool for at least 1 to 2 hours to allow the filling to set up before slicing.
I’m bingeing your videos. Here in Georgia it’s snowing and I have nothing to do (haha). This chocolate pie recipe looks so good but I’m not interested in making it right now so I’m saving the video and recipe until Christmas of 2026. I like your pacing. Good Job.
Your recipe for the chocolate pie looks delicious. I still prefer to have the pudding cooked on the stovetop . Would I cook this just until thick or bring to a slight boil ?
Thank you . We like not to put the meringue , but instead fresh whipped cream.
Yes, you would cook it until thick. It might be barely starting to boil at that point, but you’ll want to pull it off the heat immediately then and add your vanilla & butter to mix in well prior to pouring in your pie crust. 🙂
I do it that way as well! I love this chocolate cream pie, but I make the filling on the stovetop and alternatively exchange the meringue with whipped cream.
Ran across your video on YouTube for Chocolate Cream Pie. Looks delicious, Anxious to try your recipe ..Thank You.
Hope you enjoy! 🙂