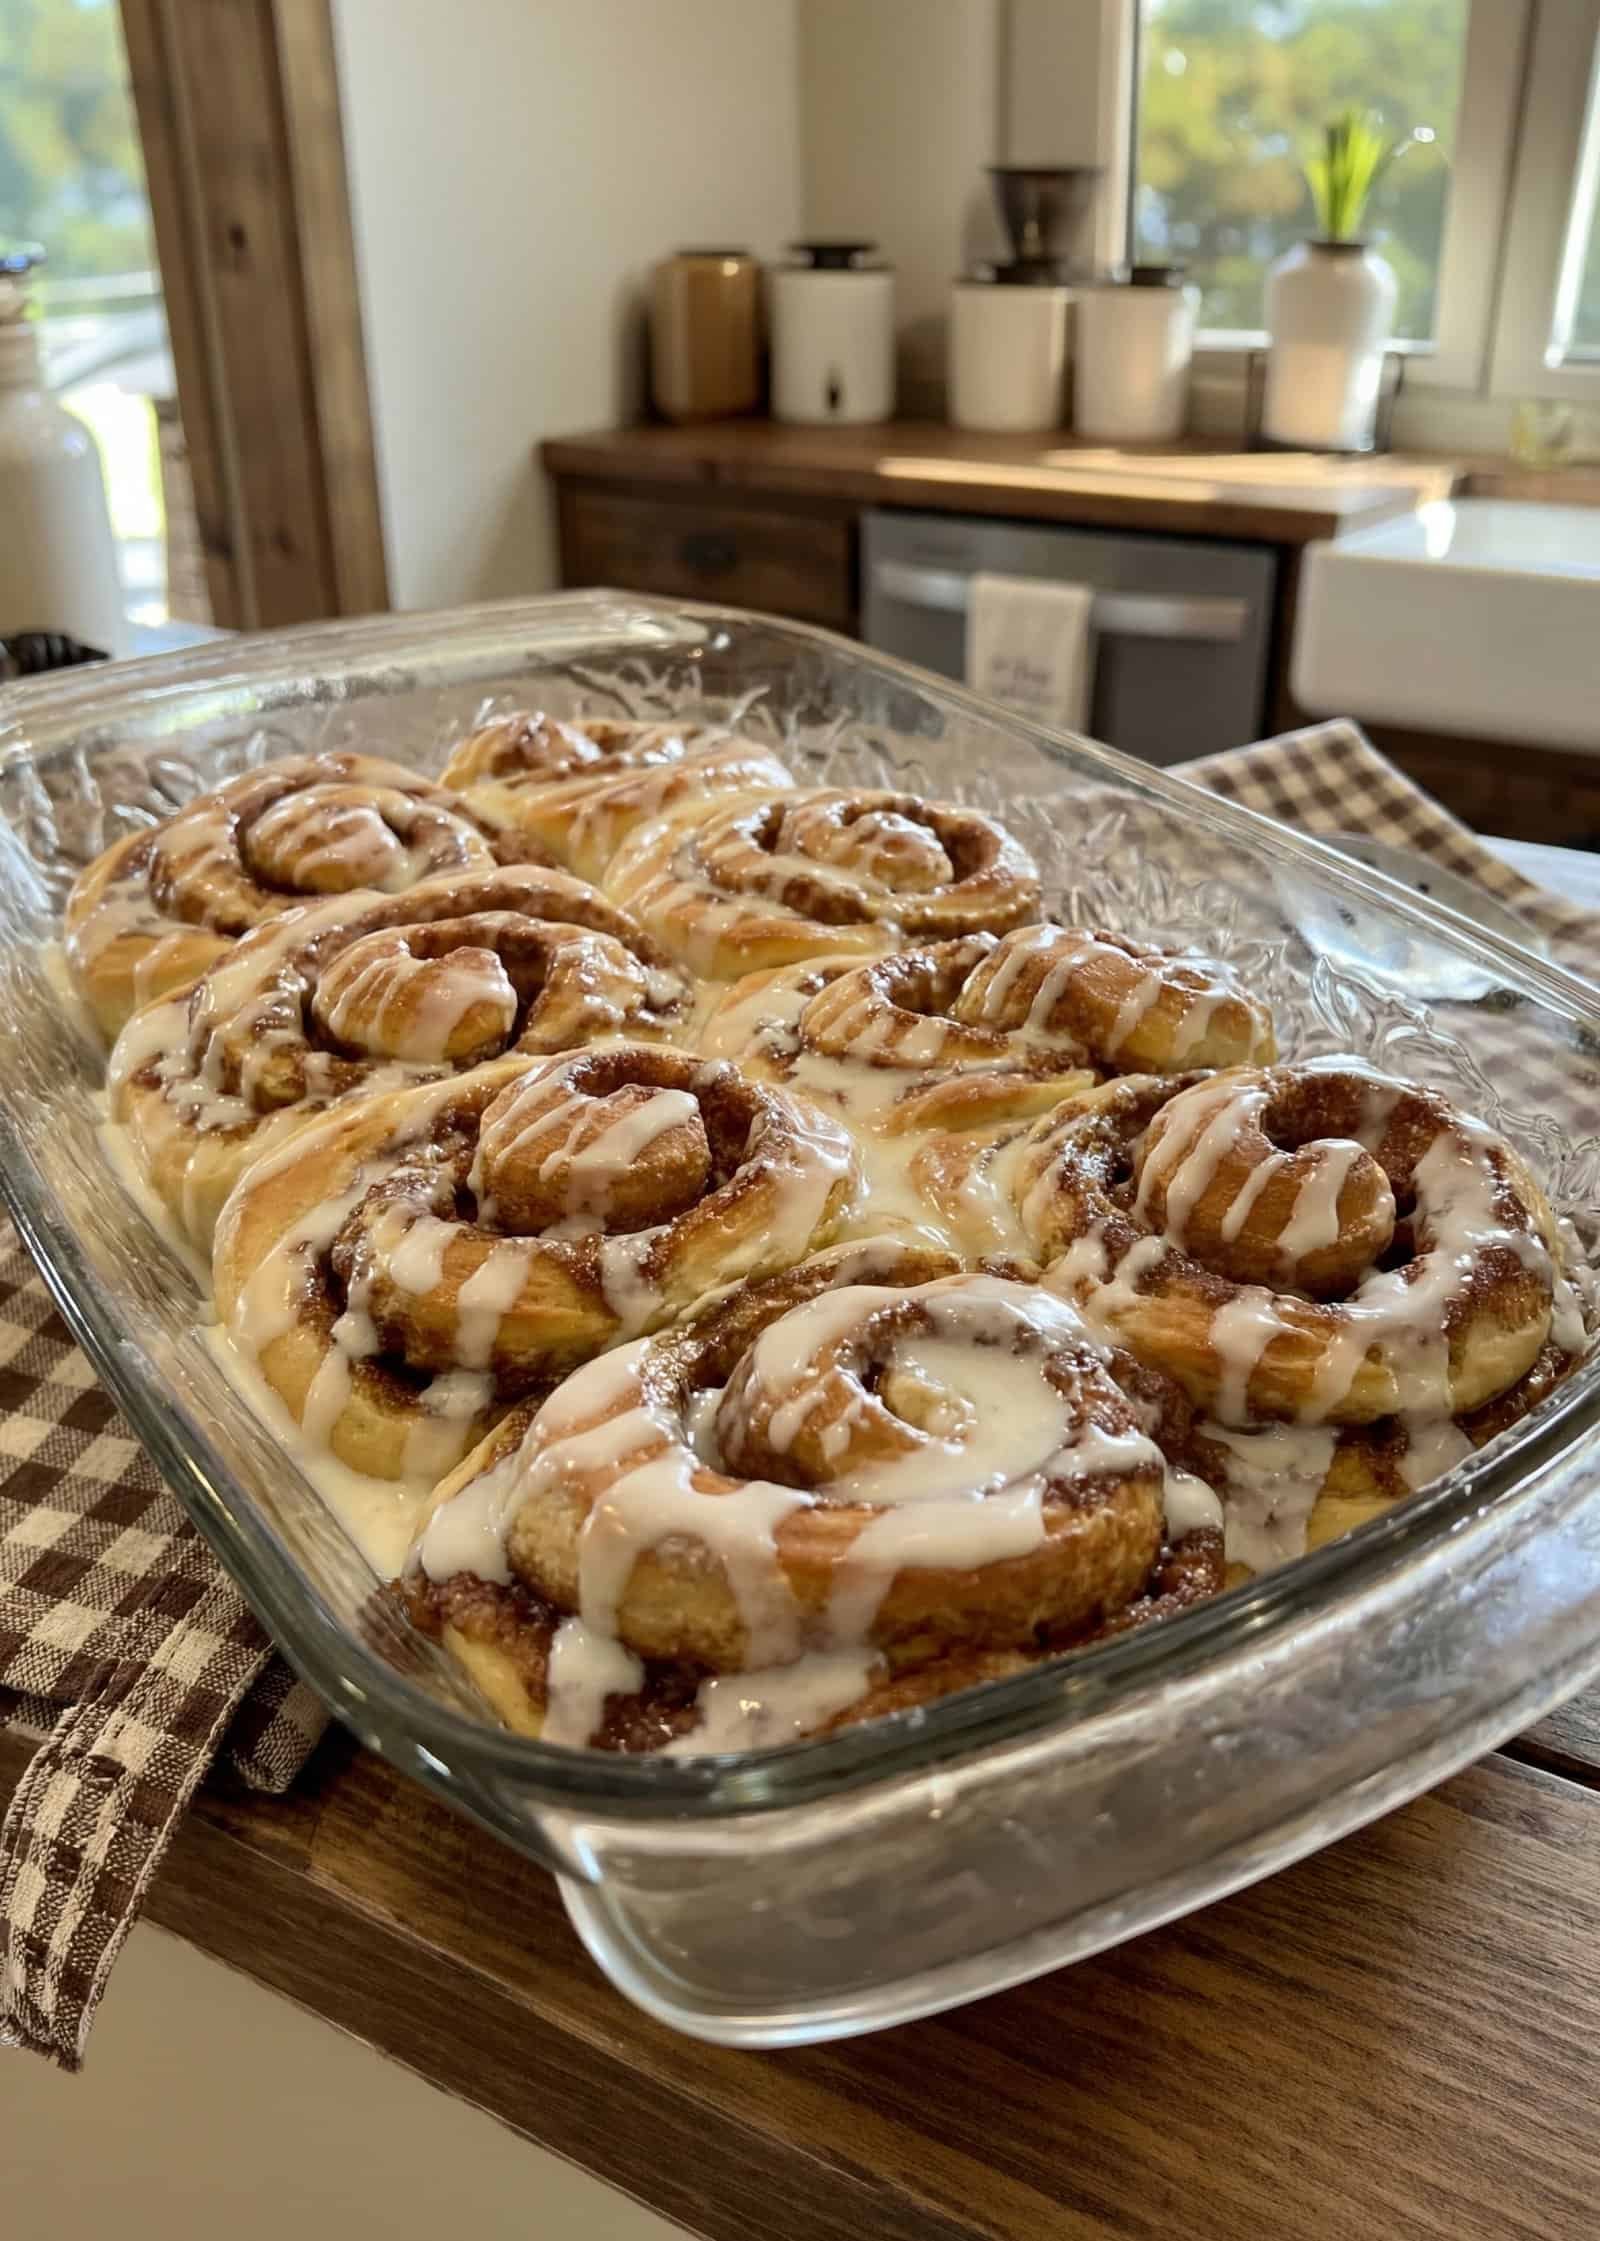
Homemade Cinnamon Rolls
Soft, pillowy, made-from-scratch cinnamon rolls with a brown sugar cinnamon filling and cream cheese icing — and a secret ingredient that keeps them fresh and soft long after they come out of the oven. This recipe makes a big batch, so you’ll have plenty to enjoy now and freeze for later. They’re easier than you think, and they are so worth it.
There’s Nothing Quite Like Homemade Cinnamon Rolls
I think most of us can agree — the smell of cinnamon rolls baking in your oven is one of the best smells in the world. And when you bite into one that’s soft and warm with that brown sugar cinnamon swirl and cream cheese icing melting down the sides? That’s just hard to beat.
The Secret to Cinnamon Rolls That Stay Soft
Now, here’s the thing that makes this recipe a little different from most cinnamon roll recipes you’ll come across. There’s an unusual ingredient in these, and it’s part of what makes them so soft — a box of instant vanilla pudding. I know, it sounds a little unexpected in a cinnamon roll recipe, right? But trust me on this one.
A lot of times, cinnamon rolls can be wonderful when they’re fresh and hot out of the oven, but then if they sit around for just a little while, they start to get hard and rubbery. These don’t do that. That pudding helps them stay that same soft and pillowy consistency, even the next day. And when you’re making a big batch like this, that matters. Because you want the ones you save for later to be just as good as the ones you eat right out of the oven.
I also want to show you two different methods for shaping your cinnamon rolls — the traditional way where you roll up the whole log and slice it, and a method where you cut individual pieces and roll them up one at a time. The second way takes a little more time, but the rolls come out with a tighter swirl and a prettier shape. I’ll walk you through both so you can decide which one works best for you.
This recipe makes a big batch — several pans worth — so it’s perfect if you want to make some now and freeze the rest for another morning. Or if you want to share a pan with a neighbor or a friend who could use a little something homemade. That’s one of my favorite things to do with a recipe that makes extra.
Homemade Cinnamon Rolls with Cream Cheese Icing
Prep Time: 30 minutes | Rise Time: 2–3 hours (two rises) | Bake Time: 15–20 minutes Yield: Approximately 24–30 cinnamon rolls (multiple pans)
Ingredients
For the Dough:
- ½ cup warm water (not too hot — just warm enough to activate the yeast)
- 2 packets active dry yeast
- 2 tablespoons sugar (to help activate the yeast)
- 1 box (3.4 oz) instant vanilla pudding mix
- 2 cups milk
- ½ cup (1 stick) butter, melted
- 2 eggs
- 1 teaspoon salt
- 6–6½ cups all-purpose flour
For the Filling:
- 1 cup (2 sticks) butter, softened (microwave 10–15 seconds — easy to work with but not melted)
- 2 cups brown sugar
- 2 tablespoons cinnamon
For the Cream Cheese Icing:
- 8 oz cream cheese, room temperature
- ½ cup (1 stick) butter, room temperature
- 4 cups powdered sugar
- 1–2 teaspoons vanilla
- 2–3 tablespoons milk
Instructions
Step 1: Activate the Yeast
In a small bowl, combine the warm water, yeast, and 2 tablespoons of sugar. Give it a quick stir and set it aside to get bubbly and active while you prepare the next step. This usually takes about 5–10 minutes.
Step 2: Make the Pudding Base
In the bowl of your stand mixer, combine the instant vanilla pudding mix and 2 cups of milk. Mix on low for about a minute — it doesn’t have to be fully set, you just want the pudding and milk to come together. Then add the melted butter, eggs, and salt. Mix until everything is combined and the mixture starts to thicken up a bit.
Step 3: Add the Yeast Mixture and Flour
Pour in your activated yeast mixture and give it a quick mix. Now start adding the flour — begin with about 4 cups and mix on low to incorporate. Then add 2 more cups (making the last one a little short of a full cup). Mix until the dough comes together and pulls away from the sides of the bowl. If it’s still too sticky, add flour a little at a time — maybe another half cup — until it’s workable. The 6 cups is really a starting point, so go by feel.
Step 4: Let the Dough Rise
Scrape down the sides of the bowl so all the dough is together. Cover the bowl with plastic wrap and set it aside in a warm spot. Let it rise until it’s about doubled in size — this will take 1 to 2 hours, depending on how warm your kitchen is.
Step 5: Make the Filling
While the dough rises, mix together the softened butter, brown sugar, and cinnamon until it forms a spreadable paste. If it’s too thick to spread easily, pop it in the microwave for just a few seconds to loosen it up. You want it easy to work with but not runny. Set this aside.
Step 6: Roll Out the Dough
Once the dough has risen, punch it down and divide it in half. Flour your work surface generously and turn out half the dough. Knead it just a few times to make it smooth, then roll it out into a large rectangle, about ¼ inch thick or a little less.
A tip here — the dough likes to spring back as you roll it. If that happens, just stop for 20–30 seconds and let it rest. Then go back to rolling. It’ll cooperate much better if you give it those little breaks.
Step 7: Fill and Shape
Spread about half the filling evenly over the rolled-out dough, leaving about a half inch along one long edge uncovered (this helps seal the roll).
Method 1 — Traditional: Roll the dough up tightly into a log starting from the long side. Then use a sharp knife (or dental floss) to slice into individual rolls, about 1½ inches thick.
Method 2 — Individual Roll (Prettier Shape): Use a pizza cutter to cut the filled dough into strips about 1½ inches wide. Then roll each strip up individually. This takes a little more time, but the rolls hold their shape better and come out with a tighter, more even swirl.
Step 8: Pan and Second Rise
Place the rolls in greased pans (cast iron skillets, 9×13 baking dishes, or round cake pans all work). Leave a little space between each roll — they need room to rise again. Cover with plastic wrap and let them rise for about 1 hour, until they’ve puffed up and are nearly touching.
Step 9: Bake
Preheat your oven to 350°F. Bake for 15–20 minutes, until the tops are golden brown. Don’t overbake — you want them soft in the middle.
Step 10: Make the Cream Cheese Icing
While the rolls bake, beat the cream cheese and butter together until smooth. Add the powdered sugar, vanilla, and milk, mixing until creamy. If you need to thin it out, add milk a little splash at a time. You want it thick enough to hold its shape when piped, but smooth enough to drizzle.
Step 11: Ice and Serve
Let the cinnamon rolls cool for about 5 minutes after coming out of the oven — you want them warm but not piping hot. Pipe or drizzle the cream cheese icing over the top. A piping bag (or even a Ziploc bag with one corner snipped off) makes this easy and pretty — just go in a crisscross pattern across the whole pan.
Tips & Notes
- Freezing: This recipe makes a big batch. You can freeze unbaked rolls after shaping — just cover the pan tightly and freeze. When you’re ready, thaw overnight in the fridge, let them come to room temperature and do their second rise, then bake as directed.
- The pudding makes the difference. It keeps the rolls soft and fresh longer than most recipes. Even the next day, they’ll still be pillowy.
- Don’t overwork the dough. Add just enough flour for it to be workable. Too much flour makes the rolls dense instead of soft.
- Bacon grease or butter for the pan gives you a little crunch on the bottom. Just a light coating is all you need.
Frequently Asked Questions
Can I make the dough the night before? You can. Let the dough do its first rise, then punch it down, cover tightly, and refrigerate overnight. The next morning, pull it out, let it come to room temperature (about 30 minutes), and continue with rolling, filling, and the second rise. Your morning cinnamon rolls will be ready faster that way.
What kind of pudding mix should I use? Just the regular instant vanilla pudding — the small 3.4 oz box. Don’t use the cook-and-serve kind, and don’t use the sugar-free version. The regular instant vanilla is what works here.
Can I use a hand mixer instead of a stand mixer? You can mix the wet ingredients with a hand mixer, but once you start adding the flour, it gets pretty thick. You may need to switch to stirring by hand with a wooden spoon or spatula for the last couple cups of flour. A stand mixer with a dough hook is ideal if you have one.
Which shaping method is better — traditional or individual roll? Both work well and taste the same. The traditional method is faster. The individual roll method gives you prettier, more uniform rolls with a tighter swirl. If you’re giving these as a gift or want them to look extra special, the individual method is worth the extra time.
How do I know when they’ve risen enough? For the first rise, the dough should roughly double in size in the bowl. For the second rise in the pan, the rolls should be puffy and nearly touching each other. They’ll puff up a bit more in the oven, so don’t wait until they’re completely filling the pan.
Can I add anything to the filling? Absolutely. Some people like to add raisins, chopped pecans, or walnuts to the filling. Just sprinkle them over the brown sugar mixture before you roll the dough up. Make it your own.
How long do these stay fresh? This is where that pudding really shines. These cinnamon rolls stay soft and fresh for 2–3 days stored at room temperature in a covered container. Most homemade cinnamon rolls start getting tough after just a few hours, but these hold up beautifully.
Can I use a different icing? Of course. A simple powdered sugar glaze (powdered sugar, milk, and vanilla) works great if cream cheese isn’t your thing. But the cream cheese icing is our family’s favorite — it’s the perfect pairing with that warm cinnamon filling.
I hope you’ll give these a try. They really are delicious, and that pudding trick is a game changer. Let me know how yours turn out — I really want to hear from you. And remember, go out today and find somebody who needs a little bit of kindness and give them some of yours.
Homemade Cinnamon Rolls
Ingredients
For the Dough:
- ½ cup warm water not too hot — just warm enough to activate the yeast
- 2 packets active dry yeast
- 2 tablespoons sugar to help activate the yeast
- 1 box 3.4 oz instant vanilla pudding mix
- 2 cups milk
- ½ cup 1 stick butter, melted
- 2 eggs
- 1 teaspoon salt
- 6 –6½ cups all-purpose flour
For the Filling:
- 1 cup 2 sticks butter, softened (microwave 10–15 seconds — easy to work with but not melted)
- 2 cups brown sugar
- 2 tablespoons cinnamon
For the Cream Cheese Icing:
- 8 oz cream cheese room temperature
- ½ cup 1 stick butter, room temperature
- 4 cups powdered sugar
- 1 –2 teaspoons vanilla
- 2 –3 tablespoons milk
Instructions
- Step 1: Activate the YeastIn a small bowl, combine the warm water, yeast, and 2 tablespoons of sugar. Give it a quick stir and set it aside to get bubbly and active while you prepare the next step. This usually takes about 5–10 minutes.
- Step 2: Make the Pudding BaseIn the bowl of your stand mixer, combine the instant vanilla pudding mix and 2 cups of milk. Mix on low for about a minute — it doesn't have to be fully set, you just want the pudding and milk to come together. Then add the melted butter, eggs, and salt. Mix until everything is combined and the mixture starts to thicken up a bit.
- Step 3: Add the Yeast Mixture and FlourPour in your activated yeast mixture and give it a quick mix. Now start adding the flour — begin with about 4 cups and mix on low to incorporate. Then add 2 more cups (making the last one a little short of a full cup). Mix until the dough comes together and pulls away from the sides of the bowl. If it's still too sticky, add flour a little at a time — maybe another half cup — until it's workable. The 6 cups is really a starting point, so go by feel.
- Step 4: Let the Dough RiseScrape down the sides of the bowl so all the dough is together. Cover the bowl with plastic wrap and set it aside in a warm spot. Let it rise until it's about doubled in size — this will take 1 to 2 hours, depending on how warm your kitchen is.
- Step 5: Make the FillingWhile the dough rises, mix together the softened butter, brown sugar, and cinnamon until it forms a spreadable paste. If it's too thick to spread easily, pop it in the microwave for just a few seconds to loosen it up. You want it easy to work with but not runny. Set this aside.
- Step 6: Roll Out the DoughOnce the dough has risen, punch it down and divide it in half. Flour your work surface generously and turn out half the dough. Knead it just a few times to make it smooth, then roll it out into a large rectangle, about ¼ inch thick or a little less.A tip here — the dough likes to spring back as you roll it. If that happens, just stop for 20–30 seconds and let it rest. Then go back to rolling. It'll cooperate much better if you give it those little breaks.
- Step 7: Fill and ShapeSpread about half the filling evenly over the rolled-out dough, leaving about a half inch along one long edge uncovered (this helps seal the roll).Method 1 — Traditional: Roll the dough up tightly into a log starting from the long side. Then use a sharp knife (or dental floss) to slice into individual rolls, about 1½ inches thick.Method 2 — Individual Roll (Prettier Shape): Use a pizza cutter to cut the filled dough into strips about 1½ inches wide. Then roll each strip up individually. This takes a little more time, but the rolls hold their shape better and come out with a tighter, more even swirl.
- Step 8: Pan and Second RisePlace the rolls in greased pans (cast iron skillets, 9×13 baking dishes, or round cake pans all work). Leave a little space between each roll — they need room to rise again. Cover with plastic wrap and let them rise for about 1 hour, until they've puffed up and are nearly touching.
- Step 9: BakePreheat your oven to 350°F. Bake for 15–20 minutes, until the tops are golden brown. Don't overbake — you want them soft in the middle.
- Step 10: Make the Cream Cheese IcingWhile the rolls bake, beat the cream cheese and butter together until smooth. Add the powdered sugar, vanilla, and milk, mixing until creamy. If you need to thin it out, add milk a little splash at a time. You want it thick enough to hold its shape when piped, but smooth enough to drizzle.
- Step 11: Ice and ServeLet the cinnamon rolls cool for about 5 minutes after coming out of the oven — you want them warm but not piping hot. Pipe or drizzle the cream cheese icing over the top. A piping bag (or even a Ziploc bag with one corner snipped off) makes this easy and pretty — just go in a crisscross pattern across the whole pan.
Video
Notes
- Freezing: This recipe makes a big batch. You can freeze unbaked rolls after shaping — just cover the pan tightly and freeze. When you’re ready, thaw overnight in the fridge, let them come to room temperature and do their second rise, then bake as directed.
- The pudding makes the difference. It keeps the rolls soft and fresh longer than most recipes. Even the next day, they’ll still be pillowy.
- Don’t overwork the dough. Add just enough flour for it to be workable. Too much flour makes the rolls dense instead of soft.
- Bacon grease or butter for the pan gives you a little crunch on the bottom. Just a light coating is all you need.