
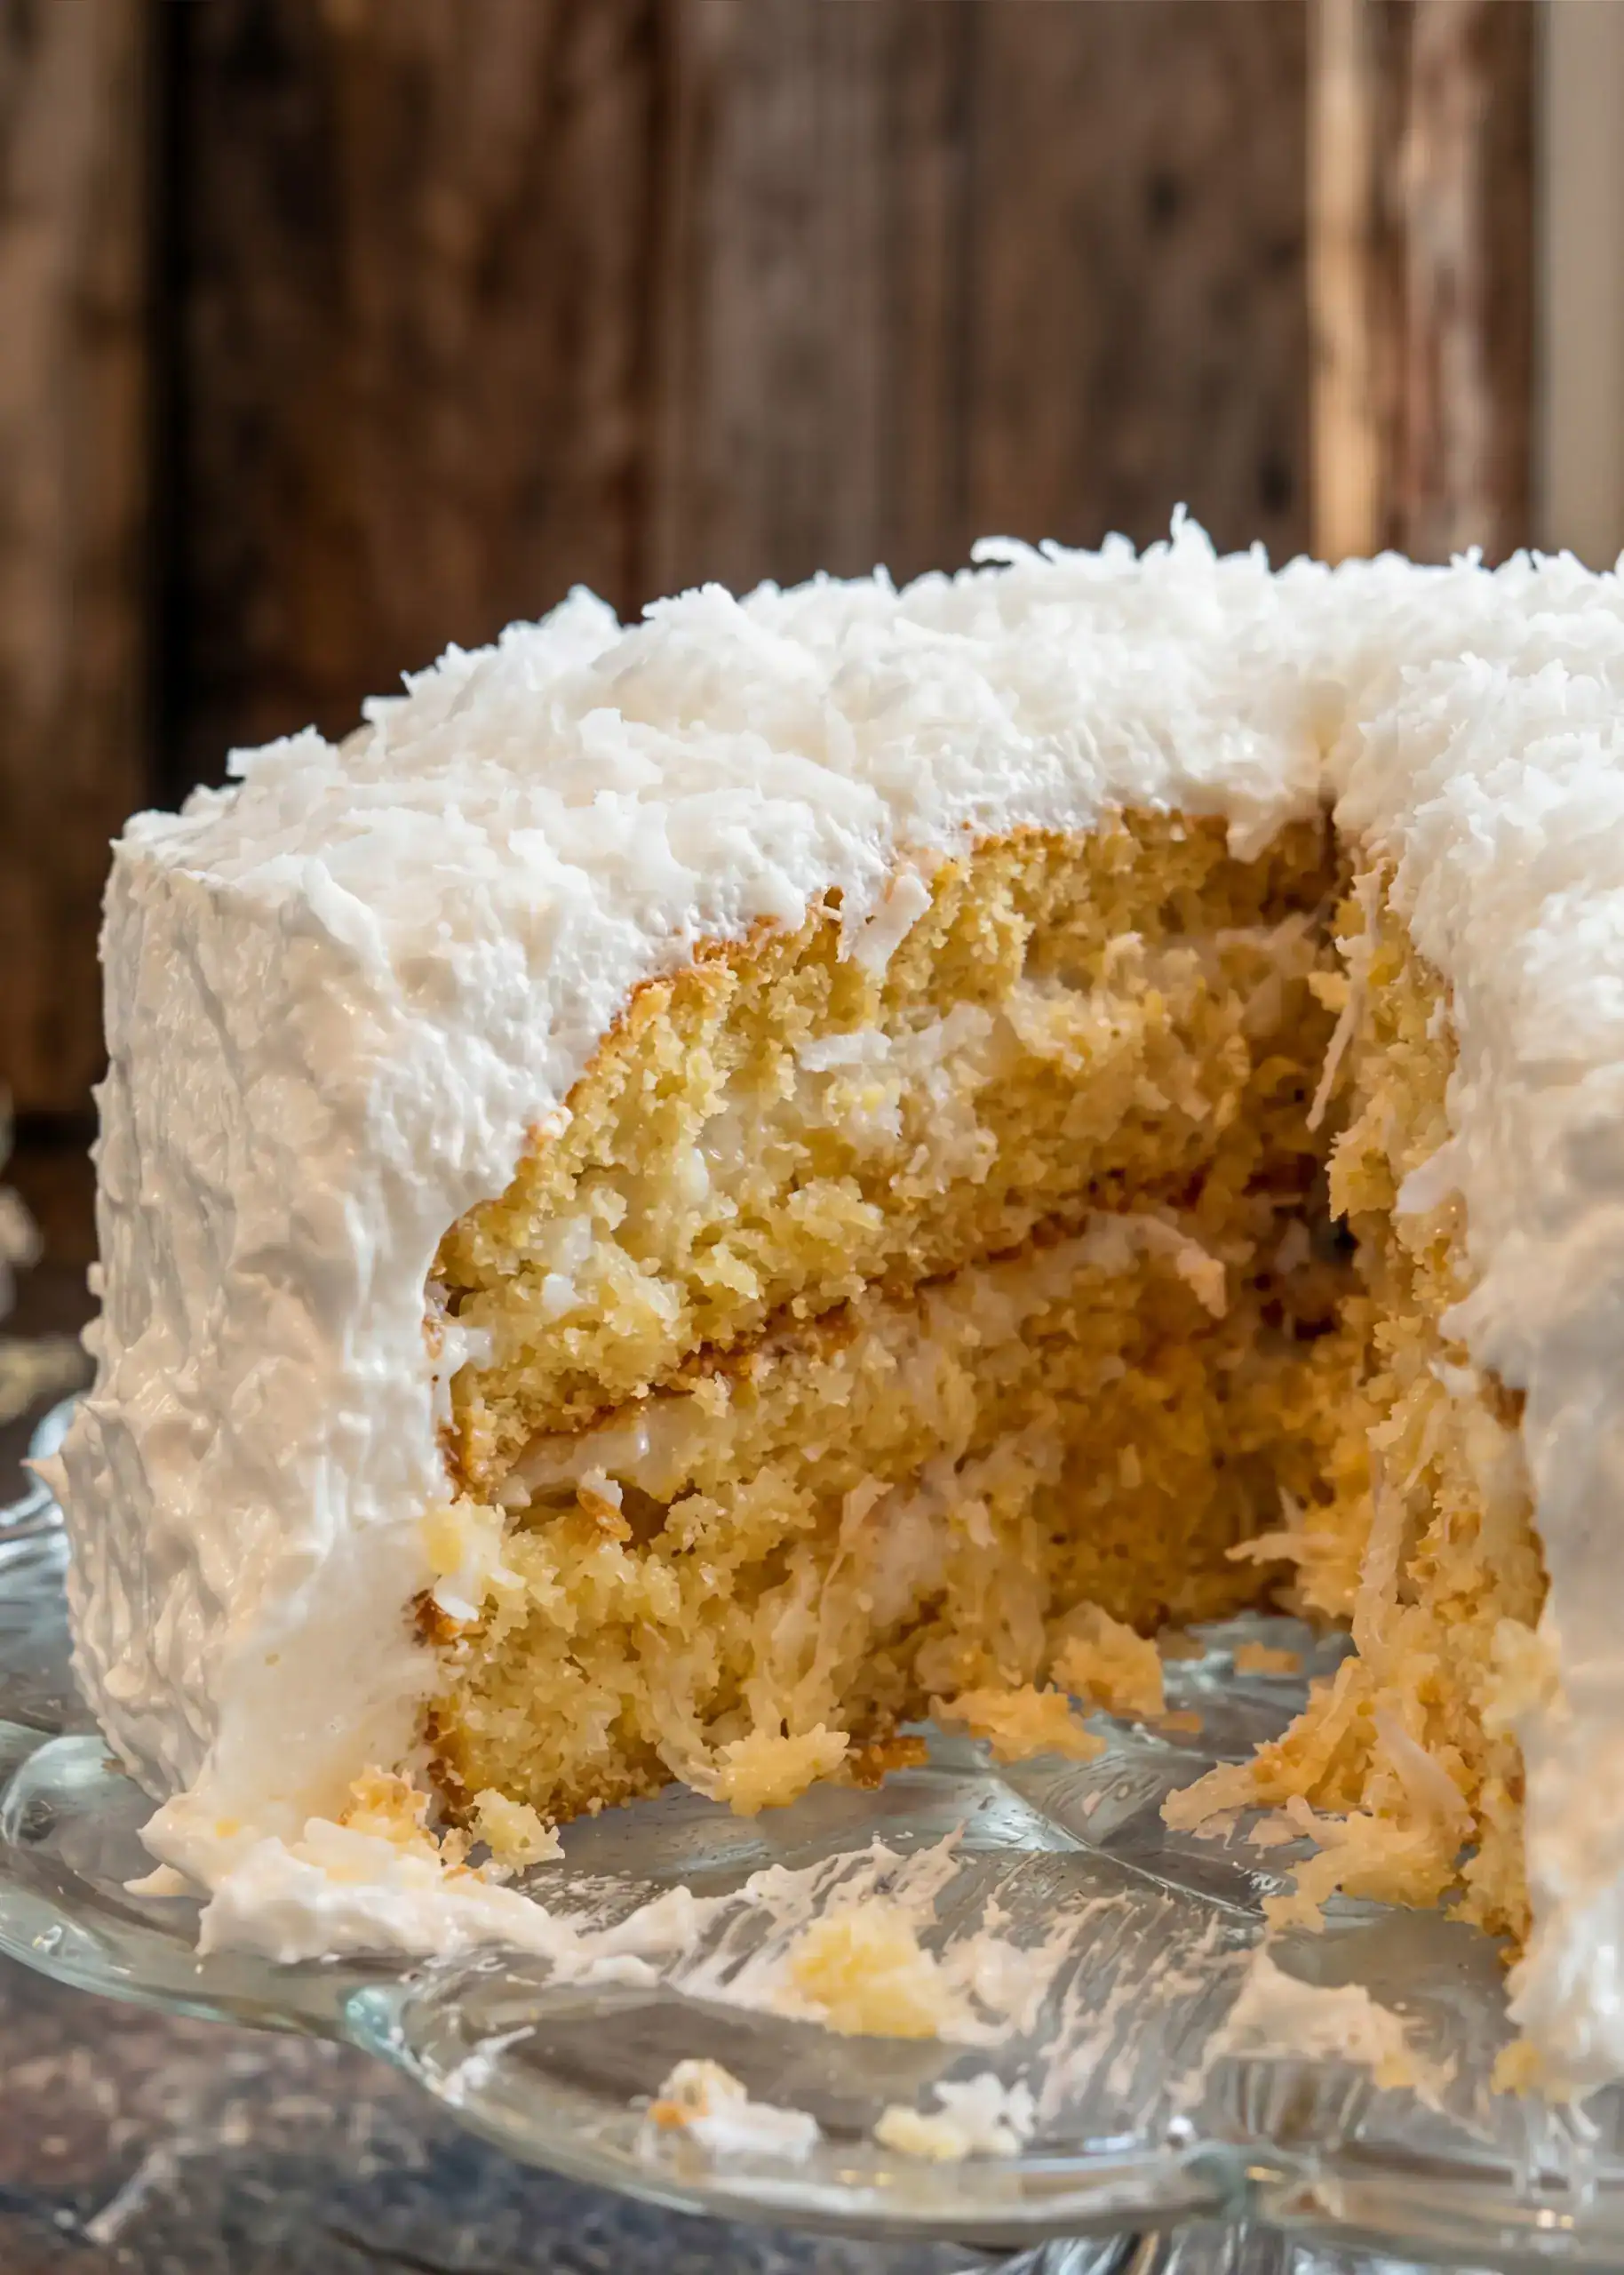
Mary Ann’s Coconut Cake
This coconut cake is the real deal — moist, layered, soaked in a sweet coconut filling, and covered in a light and airy whipped topping frosting. And the secret? It starts with a yellow box cake mix. The icing is just three ingredients: granulated sugar, sour cream, and coconut. Half goes between the layers as a filling, and the other half gets mixed with Cool Whip and spread over the outside. Let it sit in the fridge for at least 24 hours and the result is a cake that tastes like it took all day — but didn’t. It’s a perfect make-ahead dessert for Easter, family gatherings, or anytime you want something beautiful and delicious without a lot of fuss.
A Little Story First
This recipe goes all the way back to when Darren and I were newlyweds. We were living in Mineral Springs, North Carolina — this tiny little town that didn’t even have a stoplight. But what it did have was the sweetest group of people, especially in our little church there.
One of those people was a lady named Mary Ann. And Mary Ann made this coconut cake. When Darren tasted it for the first time, he couldn’t get over it. He was like, “You have got to get this recipe.” And when she gave it to us, we were just floored by how simple it was. We couldn’t believe something that tasted that good could be that easy.
That was over 36 years ago, and we’ve been making Mary Ann’s coconut cake ever since. We don’t make it often — maybe once or twice a year — but when we do, it never lasts long. We brought this one to a big family dinner with our extended family, and our son Jonathan did the taste test on camera. He said it was a keeper. And our family friend Jeff walked by, took a bite off his wife’s plate, and his reaction was like he’d died and gone to heaven. I so wish we had that on film.
The truth is, coconut can be a little controversial — you either love it or you don’t. But if you’re team coconut, this cake is going to be one of the best you’ve ever had. And if you’re on the fence, I think this one might just win you over.
How to Make Mary Ann’s Coconut Cake
Prep Time: 30 minutes (plus overnight freezing and 24-hour refrigeration) Bake Time: 23–28 minutes Servings: 12–16 Difficulty: Easy
Ingredients
For the Cake:
- 1 yellow cake mix
- Eggs, oil, and water per box directions (typically 3 eggs, ½ cup oil, 1 cup water)
For the Coconut Filling and Frosting:
- 2 cups granulated sugar (not powdered sugar)
- 1½ cups sour cream
- 12 oz coconut (frozen, fresh, or bagged — any kind works)
- 1 container (9 oz) whipped topping (Cool Whip), thawed
- Extra coconut for sprinkling on top
Instructions
1. Bake the Cake
Preheat your oven to 350°F. Grease and flour two 9-inch round cake pans (or use baking spray). Mix the cake according to the box directions — just add your water, oil, and eggs and beat for about two minutes. Scrape down the sides of the bowl halfway through to make sure everything is well combined. Divide the batter evenly between the two pans. If you see any air bubbles, give the pans a quick thump on the countertop to release them. Bake for 23–28 minutes, or until a toothpick inserted in the center comes out clean. You want this cake to be fully baked through since we’re going to slice the layers in half later.
2. Cool and Freeze the Layers
Let the cake layers cool completely in their pans. You don’t even need to remove them — just wrap them with plastic wrap right in the pans and pop them in the freezer. Leave them overnight, or at least long enough to freeze solid. This step is important because the cake is too tender to slice in half when it’s fresh. Freezing it gives it the right consistency to cut cleanly. If you need to freeze them longer than overnight, wrap in plastic wrap first and then place in a freezer-safe bag for extra protection.
3. Make the Coconut Filling
In a large bowl, mix together the 2 cups of granulated sugar, 1½ cups of sour cream, and 12 oz of coconut. I know sour cream sounds odd for a cake icing, but trust me — it’s going to be delicious. Stir it well until everything is combined and the sugar is fully mixed in. This is honestly about the hardest part of the whole cake, just getting everything stirred together.
4. Divide the Filling
Split the coconut mixture roughly in half. One half stays as-is — that’s your filling for between the layers. To the other half, fold in the 9 oz of thawed whipped topping until it’s light and well combined. That becomes your outside frosting.
5. Slice and Assemble
Take the frozen cake layers out of the freezer and remove the plastic wrap. Using a serrated knife, carefully slice each layer in half horizontally. Keep your hand on top and turn the cake as you cut, working your way to the center. You should end up with four thin layers total.
Place the first layer on your serving plate. Spread about one-third of the plain coconut filling (without the whipped topping) over the top. Add the second layer, flipping it so the cut side faces down into the filling — this lets the filling soak into that fresh-cut surface. Spread another third of the filling. Repeat with the third layer and use the remaining filling. Place the fourth layer on top.
6. Frost the Outside
Take the coconut mixture with the whipped topping folded in and spread it generously over the top and all the way down the sides. There’s plenty of this mixture, so don’t be shy with it. It creates a light, airy frosting that’s not overly heavy. Sprinkle extra coconut all over the top so there’s no question what kind of cake this is.
7. Refrigerate and Wait
This is the part that requires a little patience. Cover the cake and refrigerate it for at least 24 hours before serving. You can let it sit for up to 3 days. This resting time lets all that coconut filling soak into the cake layers, and that’s what makes it so incredibly moist and flavorful. Do not skip this step.
Tips
- Don’t skip the freezing step. The cake layers are too soft and tender to slice in half when they’re fresh. Freezing them makes all the difference.
- Any coconut works. Frozen, fresh, or the bagged coconut from the baking aisle — all of it works in this recipe. Use about 12 oz total.
- This cake gets better with time. Day 2 or 3 in the fridge is often even better than day 1. The filling continues to soak into the layers.
- Make it ahead for gatherings. Since it needs at least 24 hours in the fridge anyway, this is a perfect dessert to make a day or two before your event.
Frequently Asked Questions
Can I use homemade cake layers instead of a box mix? You absolutely can. Use your favorite yellow cake recipe baked in two 9-inch round pans. The filling and frosting are what really make this cake special, so they’ll work beautifully with homemade layers too. The box mix just makes it faster and easier.
What kind of coconut should I use? Any kind will work — frozen coconut, fresh coconut, or the sweetened shredded coconut you find in bags on the baking aisle. You just need about 12 oz total. If you’re using unsweetened coconut, the sugar in the filling will more than make up for it.
Can I use a different flavor of cake mix? Yellow works best because it has a neutral, buttery flavor that lets the coconut shine. White cake mix would also work. I’d avoid chocolate or anything strongly flavored since it would compete with the coconut.
Why does the cake need to sit in the fridge for 24 hours? That refrigeration time is what makes this cake so special. The coconut filling slowly soaks into the cake layers, making them incredibly moist. Cutting into it too early means the filling hasn’t had time to do its thing, and the texture won’t be the same.
Can I make this more than 3 days ahead? I wouldn’t go much beyond 3 days. The whipped topping on the outside starts to break down after that. But 1–3 days in the fridge is the sweet spot.
Do I have to freeze the cake layers before slicing? I highly recommend it. When the cake is fresh and at room temperature, it’s very tender and will crumble or tear when you try to cut it in half horizontally. Even a few hours in the freezer makes a big difference. Overnight is ideal.
Can I use a different size pan? Two 9-inch round pans is what this recipe is designed for. If you only have 8-inch pans, the layers will be a little thicker and may need a couple extra minutes of bake time. You could also bake it in a 9×13 pan and skip the layer-slicing step — just poke holes in the top and spread the filling over it. It won’t look the same, but it’ll taste great.
What if I’m not a fan of Cool Whip? You can substitute stabilized whipped cream. Whip one and a half cups of heavy cream with a couple tablespoons of powdered sugar until stiff peaks form, then fold it into the coconut mixture the same way you’d fold in the Cool Whip. Just keep in mind the cake needs to stay refrigerated either way.
Is this cake good for Easter? Coconut cake is a classic Easter dessert, and this one is especially good for it because you can make it ahead. Bake your layers, freeze them, assemble the cake 1–3 days before Easter, and it’s ready to go when you need it. One less thing to worry about on the day.
How should I store leftovers? Keep the cake covered in the refrigerator. It stores well for up to 3 days after you’ve first assembled it. I wouldn’t recommend freezing the finished cake since the whipped topping doesn’t freeze and thaw well, but you can freeze the plain baked layers before assembling if you want to get a head start.
Coconut Cake
Ingredients
For the Cake:
- 1 yellow cake mix
- Eggs, oil, and water per box directions (typically 3 eggs, ½ cup oil, 1 cup water)
For the Coconut Filling and Frosting:
- 2 cups granulated sugar not powdered sugar
- 1½ cups sour cream
- 12 oz coconut frozen, fresh, or bagged — any kind works
- 1 container 9 oz whipped topping (Cool Whip), thawed
- Extra coconut for sprinkling on top
Instructions
Bake the Cake
- Preheat your oven to 350°F. Grease and flour two 9-inch round cake pans (or use baking spray). Mix the cake according to the box directions — just add your water, oil, and eggs and beat for about two minutes. Scrape down the sides of the bowl halfway through to make sure everything is well combined. Divide the batter evenly between the two pans. If you see any air bubbles, give the pans a quick thump on the countertop to release them. Bake for 23–28 minutes, or until a toothpick inserted in the center comes out clean. You want this cake to be fully baked through since we’re going to slice the layers in half later.
- Cool and Freeze the Layers
- Let the cake layers cool completely in their pans. You don’t even need to remove them — just wrap them with plastic wrap right in the pans and pop them in the freezer. Leave them overnight, or at least long enough to freeze solid. This step is important because the cake is too tender to slice in half when it’s fresh. Freezing it gives it the right consistency to cut cleanly. If you need to freeze them longer than overnight, wrap in plastic wrap first and then place in a freezer-safe bag for extra protection.
Make the Coconut Filling
- In a large bowl, mix together the 2 cups of granulated sugar, 1½ cups of sour cream, and 12 oz of coconut. I know sour cream sounds odd for a cake icing, but trust me — it’s going to be delicious. Stir it well until everything is combined and the sugar is fully mixed in. This is honestly about the hardest part of the whole cake, just getting everything stirred together.
Divide the Filling
- Split the coconut mixture roughly in half. One half stays as-is — that’s your filling for between the layers. To the other half, fold in the 9 oz of thawed whipped topping until it’s light and well combined. That becomes your outside frosting.
Slice and Assemble
- Take the frozen cake layers out of the freezer and remove the plastic wrap. Using a serrated knife, carefully slice each layer in half horizontally. Keep your hand on top and turn the cake as you cut, working your way to the center. You should end up with four thin layers total.
- Place the first layer on your serving plate. Spread about one-third of the plain coconut filling (without the whipped topping) over the top. Add the second layer, flipping it so the cut side faces down into the filling — this lets the filling soak into that fresh-cut surface. Spread another third of the filling. Repeat with the third layer and use the remaining filling. Place the fourth layer on top.
Frost the Outside
- Take the coconut mixture with the whipped topping folded in and spread it generously over the top and all the way down the sides. There’s plenty of this mixture, so don’t be shy with it. It creates a light, airy frosting that’s not overly heavy. Sprinkle extra coconut all over the top so there’s no question what kind of cake this is.
Refrigerate and Wait
- This is the part that requires a little patience. Cover the cake and refrigerate it for at least 24 hours before serving. You can let it sit for up to 3 days. This resting time lets all that coconut filling soak into the cake layers, and that’s what makes it so incredibly moist and flavorful. Do not skip this step.


I made your recipe for the Coconut Cake on Easter Sunday it was great. I love that it was so moist. It’s very sweet so I may tweak the recipe for the icing next time. My family really liked it. It will definitely be made again for my family. It’s a keeper recipe and a winner!
So glad you all enjoyed it! Thanks for letting me know!
It looks fabulous I am a big Coconut Fan❣️❣️❣️
Thank you for the recipe❣️
It is so delicious. Hope you enjoy it! 🙂