Homemade Chocolate Layer Cake with Almond Buttercream Icing
Two layers of rich, moist chocolate cake topped with a smooth almond buttercream icing — and you don’t even need a mixer to make it. This cake comes together in a bowl and a saucepan with simple pantry ingredients, bakes in under 20 minutes, and tastes like something from a high-end bakery. The almond buttercream adds a subtle sweetness that pairs beautifully with the deep chocolate flavor. Decorate it with candy bunnies for Easter, or keep it simple for any occasion. Either way, your family is going to love this one.
A Cake for the Whole Family
I’ll be honest with you — I’m not a cake decorator. I admire those people who can pipe perfect roses and make those gorgeous layered designs, but that’s just not me. And I think a lot of people feel the same way. You might love to bake, but when it comes to making a layer cake look pretty, it feels a little intimidating.
That’s exactly why I wanted to share this cake with you. Because it’s one of those recipes where the cake itself does most of the heavy lifting. The chocolate is rich and moist — almost dense in the best way — and the almond buttercream icing is smooth and spreads like a dream. You don’t need any special tools or piping bags. Just a little spreader and some patience, and you’ll end up with a beautiful cake.
Now, the almond buttercream is something special. If you’ve ever been to a wedding and had that icing on the wedding cake that just tasted so good — that’s almond buttercream. When you open that bottle of almond extract, the smell just hits you, and it is heavenly. I balanced it with a little vanilla too, so it’s not overpowering, but that almond flavor really shines through and pairs so well with the chocolate.
We took this cake to a big Sunday dinner with extended family, and it was a hit. Our grandson Bentley got the first taste, and when I asked him for a thumbs up or thumbs down, he said infinity. I think that tells you everything you need to know. Our daughter-in-law loved it too, and she’s a serious chocolate fan. Several people commented on it, and honestly, I don’t think there was much left to bring home.
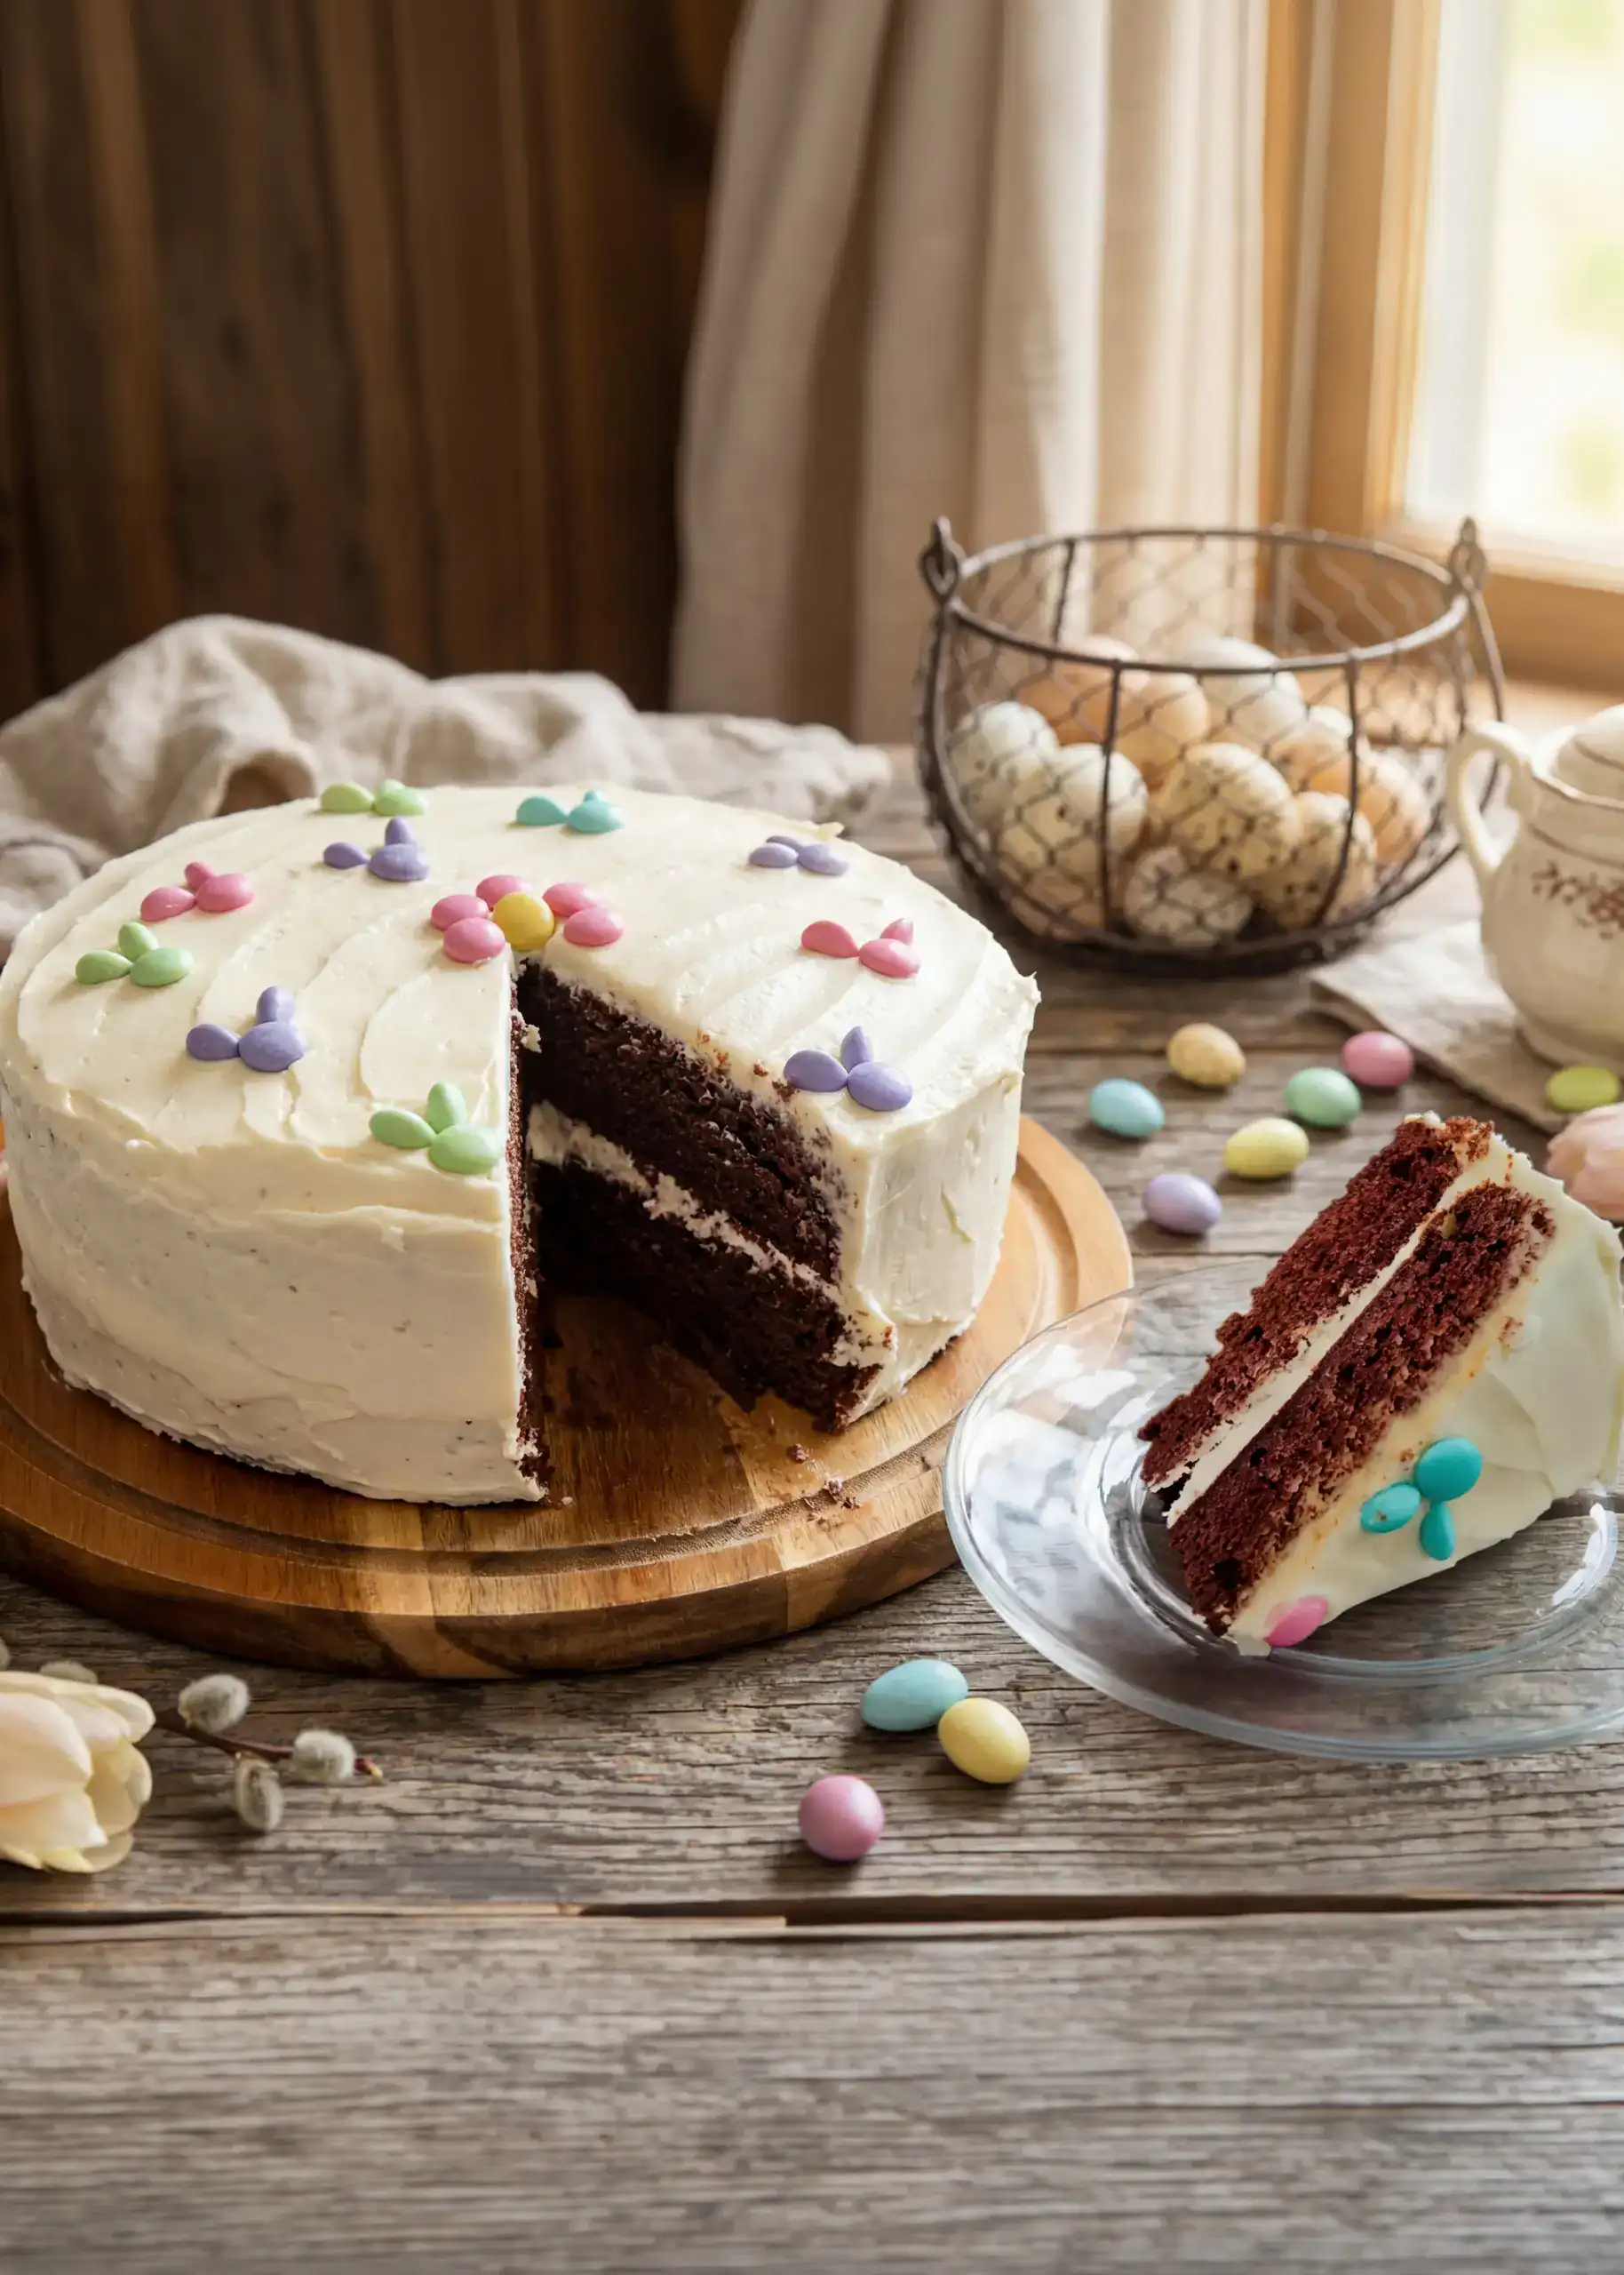
And for Easter, I decorated the top with candy M&M truffles — a little flower in the center and the cutest little bunnies made by cutting M&Ms in half for ears. The kids absolutely loved it. It’s the kind of decoration that anybody can do, and it makes the cake look so festive without any real decorating skill required.
Chocolate Layer Cake with Almond Buttercream Icing
Prep Time: 20 minutes | Bake Time: 19 minutes | Icing Time: 15 minutes Yield: One 9-inch two-layer cake (serves 12–16) Oven Temperature: 350°F
Ingredients
For the Chocolate Cake:
- 2 cups granulated sugar
- 2 cups all-purpose flour
- 1 cup water
- 1 cup (2 sticks) salted butter
- ½ cup buttermilk
- ½ cup cocoa powder
- 2 eggs
- 1 teaspoon vanilla extract
- 1 teaspoon baking soda
For the Almond Buttercream Icing:
- 1 cup (2 sticks) butter, room temperature
- 4 cups powdered sugar
- ¼ cup milk, plus a splash more if needed
- 1 teaspoon almond extract
- 1 teaspoon vanilla extract
For Decorating (Optional — Easter Style):
- M&M truffle candies in assorted colors
Instructions
Making the Cake
- Preheat your oven to 350°F. Spray two 9-inch round cake pans with baking spray (or grease and flour them).
- In a large bowl, whisk together 2 cups of sugar and 2 cups of flour until well combined and any lumps are broken up. This only takes about a minute, but it makes a difference — the mixture will look noticeably finer once that sugar is mixed in with the flour. Set this aside.
- In a saucepan, combine the water, butter, buttermilk, and cocoa powder. Place over medium heat and whisk occasionally as the butter melts. You don’t have to stir it constantly at first, but as it gets closer to boiling, whisk it more frequently. Bring it to a boil and let it go for about 30 seconds, then remove from heat.
- Pour the hot cocoa mixture directly into the flour and sugar bowl. Whisk it all together until smooth — it comes together quickly.
- Add the vanilla and baking soda and whisk them in.
- Beat the two eggs in a separate small bowl with a fork, then add them to the cake batter and whisk until fully incorporated. You want to let the batter cool down just a bit before adding the eggs so they don’t cook on contact. By the time you’ve whisked in the vanilla and baking soda, it should be cool enough.
- Divide the batter evenly between your two prepared pans. If you see little air bubbles on top, pick the pans up and give them a few firm taps on the counter to pop them — this helps the cake bake more evenly.
- Bake at 350°F for about 19 minutes. Check it by gently pressing the center — it should spring back and not feel liquidy. You can also do the toothpick test if you prefer. Every oven is a little different, so start checking at 16 minutes. If your oven runs a little slower, it may need a minute or two more.
- Let the cakes cool completely in the pans before turning them out. If you’re not icing right away, wrap them well so they don’t dry out. These layers actually freeze beautifully — wrap them tightly and they’ll keep in the freezer for up to one or two months, and they come out even more moist.
No buttermilk? Add 1 tablespoon of lemon juice or white vinegar to 1 cup of regular milk, stir it, and let it sit for 3 to 5 minutes. It will curdle and work just like buttermilk. You only need half a cup for this recipe, so you’d use half a tablespoon in half a cup of milk.
Making the Almond Buttercream Icing
- Place 1 cup of room temperature butter in a mixing bowl. Add 4 cups of powdered sugar, ¼ cup of milk, 1 teaspoon of almond extract, and 1 teaspoon of vanilla extract.
- Start mixing on low speed until the powdered sugar is incorporated — this keeps it from flying everywhere. Once it’s combined, turn the speed up and let it whip for a few minutes until light and fluffy. A whisk attachment works great here.
- Check the consistency. You want it to spread very easily. If it’s a little too thick, add just a teaspoon or two more of milk and mix again. Don’t overdo it — a tiny bit of milk goes a long way.
- Scrape down the sides of the bowl one more time and let it whip for just a few more seconds to make sure everything is evenly mixed.
Assembling and Decorating
- Place your first cake layer on a cake stand or plate. If you’re worried about mess, tuck strips of parchment paper under the edges — you can pull them out when you’re done for a clean plate.
- Spread a generous layer of icing on top of the first layer.
- Place the second layer on top, bottom side up. Flipping it gives you a cleaner, flatter edge on the top of the cake — a little trick that makes a big difference.
- Ice the top and sides of the cake. Start by filling in any gaps around the middle seam, then work your way around the sides and top. Don’t worry about getting it absolutely perfect — a few imperfections just make it look homemade in the best way.
- For the Easter bunny decorations: Place a yellow M&M in the center of the cake, then surround it with pink M&Ms to form a little flower. For the bunnies, place one whole M&M on the top of the cake as the body, then cut another M&M in half with a sharp knife and press the two halves into the icing at the top as ears. Make as many bunnies as you’d like in different colors around the top of the cake. If the halves aren’t perfectly even, don’t worry — the cut side goes down into the icing, so it won’t show.
Frequently Asked Questions
Can I use a stand mixer for the cake batter? You can, but you really don’t need one. This entire cake comes together with just a whisk and a saucepan. If you do use a mixer, keep it on very low speed and mix only until the ingredients are just incorporated.
Can I use a different type of cocoa powder? Yes. A premium baking cocoa will give you a richer, deeper flavor, but whatever cocoa you have on hand will work just fine in this cake. Don’t let the cocoa stop you from making it.
Can I make the cake layers ahead of time? Absolutely. Once the layers have cooled completely, wrap them tightly in plastic wrap. They’ll keep in the fridge for a day or two, or in the freezer for up to one to two months. Frozen layers actually come out even more moist. Just thaw them before icing.
What if I don’t like almond flavor? Can I use something else? Of course. Just swap out the almond extract for an equal amount of vanilla extract to make a vanilla buttercream instead. It’s a delicious combination with the chocolate cake too.
Can I use a springform pan instead of regular cake pans? A 9-inch springform pan would work great and makes it easier to remove the cake. If you’re using regular cake pans like I did, just spray them well and the layers will come right out.
How do I keep the cake from sticking to the pan? Baking spray is the easiest option — one good coating is all you need. You can also go the old-fashioned route and grease the pan with butter or shortening and dust it with flour. Lining the bottom with a circle of parchment paper gives you extra insurance.
Why do I flip the top layer upside down? Placing the second layer with the bottom side facing up gives you a flatter, cleaner surface on the top of the cake. The bottom of a cake layer is always smoother than the top, so it makes icing much easier and gives the finished cake a more polished look.
How should I store this cake? Keep it covered at room temperature for up to two days, or in the refrigerator for up to four or five days. If you refrigerate it, let it sit out for about 20 to 30 minutes before serving so the icing softens up again.
Can I use unsalted butter? You can, but you may want to add just a small pinch of salt to the cake batter. Mary Katherine always uses salted butter, which adds a subtle depth of flavor that works beautifully in both the cake and the icing.
What other ways can I decorate this cake? The M&M bunnies are perfect for Easter, but this cake works for any occasion. Try fresh berries, a dusting of powdered sugar, chocolate shavings, or even a drizzle of chocolate ganache on top. Keep it simple and let the cake and icing be the stars.
Chocolate Layer Cake
Ingredients
For the Chocolate Cake:
- 2 cups granulated sugar
- 2 cups all-purpose flour
- 1 cup water
- 1 cup 2 sticks salted butter
- ½ cup buttermilk
- ½ cup cocoa powder
- 2 eggs
- 1 teaspoon vanilla extract
- 1 teaspoon baking soda
For the Almond Buttercream Icing:
- 1 cup 2 sticks butter, room temperature
- 4 cups powdered sugar
- ¼ cup milk plus a splash more if needed
- 1 teaspoon almond extract
- 1 teaspoon vanilla extract
For Decorating (Optional — Easter Style):
- M&M truffle candies in assorted colors
Instructions
Making the Cake
- Preheat your oven to 350°F. Spray two 9-inch round cake pans with baking spray (or grease and flour them).
- In a large bowl, whisk together 2 cups of sugar and 2 cups of flour until well combined and any lumps are broken up. This only takes about a minute, but it makes a difference — the mixture will look noticeably finer once that sugar is mixed in with the flour. Set this aside.
- In a saucepan, combine the water, butter, buttermilk, and cocoa powder. Place over medium heat and whisk occasionally as the butter melts. You don’t have to stir it constantly at first, but as it gets closer to boiling, whisk it more frequently. Bring it to a boil and let it go for about 30 seconds, then remove from heat.
- Pour the hot cocoa mixture directly into the flour and sugar bowl. Whisk it all together until smooth — it comes together quickly.
- Add the vanilla and baking soda and whisk them in.
- Beat the two eggs in a separate small bowl with a fork, then add them to the cake batter and whisk until fully incorporated. You want to let the batter cool down just a bit before adding the eggs so they don’t cook on contact. By the time you’ve whisked in the vanilla and baking soda, it should be cool enough.
- Divide the batter evenly between your two prepared pans. If you see little air bubbles on top, pick the pans up and give them a few firm taps on the counter to pop them — this helps the cake bake more evenly.
- Bake at 350°F for about 19 minutes. Check it by gently pressing the center — it should spring back and not feel liquidy. You can also do the toothpick test if you prefer. Every oven is a little different, so start checking at 16 minutes. If your oven runs a little slower, it may need a minute or two more.
- Let the cakes cool completely in the pans before turning them out. If you’re not icing right away, wrap them well so they don’t dry out. These layers actually freeze beautifully — wrap them tightly and they’ll keep in the freezer for up to one or two months, and they come out even more moist.
- No buttermilk? Add 1 tablespoon of lemon juice or white vinegar to 1 cup of regular milk, stir it, and let it sit for 3 to 5 minutes. It will curdle and work just like buttermilk. You only need half a cup for this recipe, so you’d use half a tablespoon in half a cup of milk.
Making the Almond Buttercream Icing
- Place 1 cup of room temperature butter in a mixing bowl. Add 4 cups of powdered sugar, ¼ cup of milk, 1 teaspoon of almond extract, and 1 teaspoon of vanilla extract.
- Start mixing on low speed until the powdered sugar is incorporated — this keeps it from flying everywhere. Once it’s combined, turn the speed up and let it whip for a few minutes until light and fluffy. A whisk attachment works great here.
- Check the consistency. You want it to spread very easily. If it’s a little too thick, add just a teaspoon or two more of milk and mix again. Don’t overdo it — a tiny bit of milk goes a long way.
- Scrape down the sides of the bowl one more time and let it whip for just a few more seconds to make sure everything is evenly mixed.
Assembling and Decorating
- Place your first cake layer on a cake stand or plate. If you’re worried about mess, tuck strips of parchment paper under the edges — you can pull them out when you’re done for a clean plate.
- Spread a generous layer of icing on top of the first layer.
- Place the second layer on top, bottom side up. Flipping it gives you a cleaner, flatter edge on the top of the cake — a little trick that makes a big difference.
- Ice the top and sides of the cake. Start by filling in any gaps around the middle seam, then work your way around the sides and top. Don’t worry about getting it absolutely perfect — a few imperfections just make it look homemade in the best way.
- For the Easter bunny decorations: Place a yellow M&M in the center of the cake, then surround it with pink M&Ms to form a little flower. For the bunnies, place one whole M&M on the top of the cake as the body, then cut another M&M in half with a sharp knife and press the two halves into the icing at the top as ears. Make as many bunnies as you’d like in different colors around the top of the cake. If the halves aren’t perfectly even, don’t worry — the cut side goes down into the icing, so it won’t show.