
5 Easy Halloween Treats to Make With Your Kids (and Grandkids)
Five Halloween treats, one fun afternoon in the kitchen. Spooky Eyes take three ingredients and two minutes in the oven. A Caramel Apple Station gives you everything you love about caramel apples without the mess. Fall Muddy Buddies get a candy corn and peanut twist. Old-Fashioned Popcorn Balls are the throwback treat neighbors used to hand out on Halloween night. And Mummy Hot Dogs are the savory one everybody grabs first. Every recipe is kid-friendly, party-ready, and simple enough that the little ones can help.
A Little Bit Spooky, a Whole Lot of Treats
This one’s a little different from our usual videos, but I’m so excited about it. Instead of one recipe, we made five. All Halloween, all fun, and all things you can make with the kids and grandkids.
A couple of these bring back real memories for me. When I was growing up, there were neighbors who made homemade treats to pass out on Halloween. I remember getting caramel apples, and I remember getting popcorn balls. Darren remembers them too. When I asked who else got popcorn balls trick-or-treating, his hand went right up.
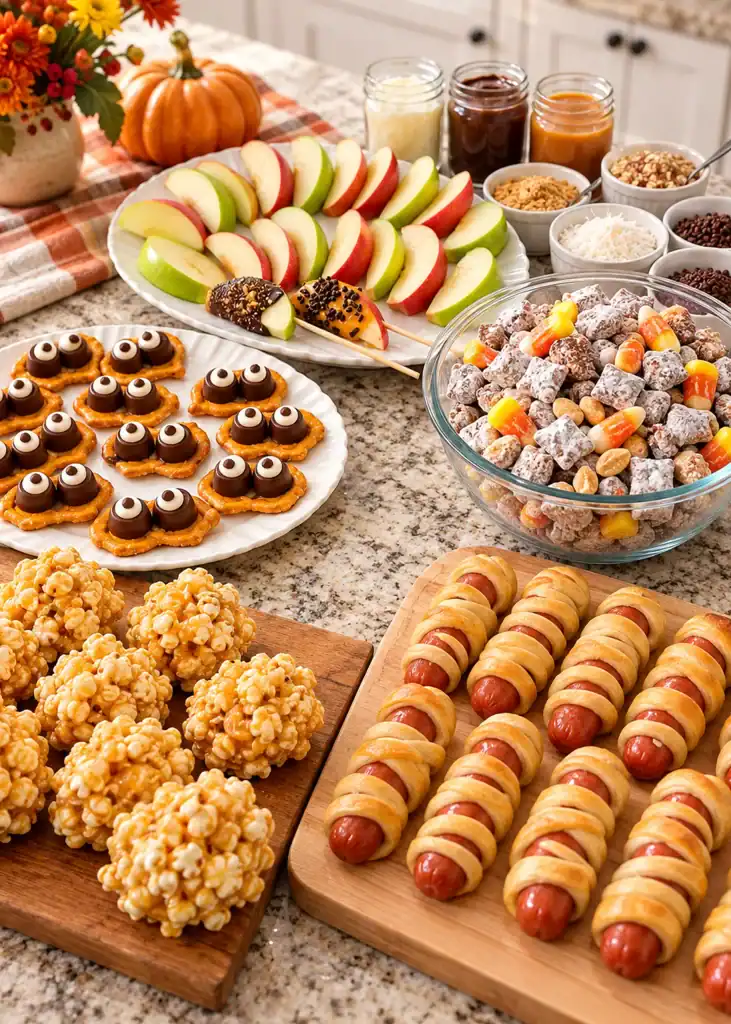
Those whole caramel apples were delicious, but let’s be honest, they’re a little messy to eat. So I put a twist on them and set up a caramel apple station where everybody can dip and top their own slice. And the popcorn balls? I made them the old-fashioned way, with a homemade syrup I called a “concoction.” Darren asked if that was legal. I told him it’s kind of like a witch’s brew. Double, double, toil and trouble!
There were Halloween jokes too (you’ll have to watch the video for those), a debate about candy corn, and a little pan of pretzel eyeballs that Darren swore kept following him around the kitchen. That’s what Halloween in the kitchen should be: fun.
1. Spooky Eyes (Pretzel Rolo Bites)
There’s really no cooking involved with these, and they are so cute. They’d be perfect for any fall gathering.
Prep: 15 minutes
Cook: 3 minutes
Makes: about 24 eyes (12 pretzels)
Ingredients
- Pretzel thins (pretzel crisps)
- Rolo candies, 2 per pretzel
- Mini marshmallows, cut in half
- Mini chocolate chips
Instructions
- Heat the oven to 300°F. Line a baking sheet and lay out the pretzel thins in a single layer. The flat pretzel crisps are the perfect size for this.
- Add the Rolos. Place two unwrapped Rolos side by side on each pretzel.
- Cut the marshmallows. Cut each mini marshmallow in half with kitchen scissors. If your scissors aren’t super sharp and the marshmallow sticks, rub a little oil on the blades. That keeps them from sticking.
- Make the pupils. Press a mini chocolate chip, point down, into the cut side of each marshmallow half. I almost think it’s easier to pick up the marshmallow and then poke the chocolate chip down into it.
- Warm the candy. Bake for 2 minutes, just long enough for the chocolate to start getting a little melty. You’ll see it glistening when it comes out.
- Work fast. Have your marshmallows ready to go as soon as the pan comes out. Press one marshmallow, cut side up, lightly onto each Rolo so it sticks.
- Set them (optional). If you want to be sure everything stays put, pop the pan back in the oven for about 20 seconds.
Tips
- Prep all your marshmallow eyes before the Rolos go in the oven. You only have a short window to press them on.
- This is a great one for little hands: kids can place the Rolos and poke in the chocolate chips.
Spooky Eyes FAQ
Can I use regular pretzel twists instead of pretzel thins?
Yes, but the flat pretzel crisps give the two Rolos a level base to sit on. Twists work if you set the Rolos over the flattest part.
Why didn’t my marshmallows stick?
The Rolos probably cooled too much before you pressed them on. Give the pan another 20 to 30 seconds in the oven and press again.
How far ahead can I make Spooky Eyes?
Make them a day ahead and store them in a single layer in an airtight container at room temperature.
Spooky Eyes (Pretzel Rolo Bites)
Equipment
- Baking sheet
- Kitchen scissors
Ingredients
- 12 pretzel thins pretzel crisps
- 24 Rolo candies unwrapped
- 24 mini marshmallows cut in half
- 48 mini chocolate chips
Instructions
- Preheat the oven to 300°F. Arrange pretzel thins in a single layer on a lined baking sheet.
- Place 2 Rolos side by side on each pretzel.
- Cut mini marshmallows in half with kitchen scissors. If the marshmallow sticks, rub a little oil on the blades.
- Press a mini chocolate chip, point down, into the cut side of each marshmallow half.
- Bake 2 minutes, just until the chocolate starts to look glossy and melty.
- Working quickly, press a marshmallow half, cut side up, lightly onto each Rolo.
- Optional: return to the oven for about 20 seconds to help everything set.
Notes
- Have all the marshmallow eyes prepped before the Rolos go in the oven. You need to work fast.
- Store in a single layer in an airtight container at room temperature for up to 2 days.
2. Caramel Apple Station
All the fun of caramel apples, none of the mess, and everybody gets to customize their own.
Prep: 20 minutes
Cook: 5 minutes
Serves: a party crowd
Ingredients
Dipping sauces
- Semisweet chocolate chips
- White chocolate morsels
- Butterscotch morsels
- Caramel bits
- A splash of oil for the chips (about 1 tablespoon or less per jar)
- A splash of heavy cream for the caramel (about 1 tablespoon or less; milk works too)
Apples
- 2 apples, washed
- 1/2 teaspoon salt
- A bowl of room-temperature water
Toppings
- Chopped pecans
- Graham cracker crumbs
- Toffee bits
- Mini chocolate chips
- Puffed rice cereal
- Coconut
- Chocolate sprinkles, or orange and black fall sprinkles
- Wooden skewers
Instructions
- Fill the jars. Put each dipping sauce ingredient in its own small mason jar. I used half-pint jars, but pints work. Anything that fits in your crock pot.
- Add a splash. Add a splash of oil to each jar of chips and a splash of heavy cream to the caramel. You really don’t have to measure.
- Melt in the microwave. Heat two jars at a time in 30-second increments, stirring all the way to the bottom between rounds. Most take a minute to a minute and a half. Watch the caramel closely; mine was completely ready at exactly one minute. White chocolate takes a little longer, and an extra splash of oil helps it along.
- Keep them warm. Set the jars in your crock pot on warm. They’ll stay nice and melted for the whole party. (You can melt them in the crock pot from the start, but you’ll need to stir often so they don’t get hard on the bottom.)
- Soak the apples. Stir 1/2 teaspoon salt into a bowl of room-temperature water. Slice the apples with an apple slicer (or a knife) and let the slices soak 5 to 10 minutes so they don’t turn brown.
- Set out the toppings. Chop the pecans finely and put each topping in its own small bowl or ramekin.
- Dry and skewer. Pat each apple slice dry really well, then slide a wooden skewer up through it.
- Dip and top! I went traditional: caramel, toffee bits, and a few pecans. That’s delicious together.
Tips
- An apple slicer makes every slice the same size, but check the core. Sometimes it doesn’t get everything out.
- Pat the slices completely dry or the dipping sauces won’t cling.
Caramel Apple Station FAQ
How do I keep apple slices from turning brown at a party?
Soak them 5 to 10 minutes in room-temperature water with 1/2 teaspoon of salt, then pat them dry. They’ll stay fresh-looking through the evening.
Will the apples taste salty?
Not with only 1/2 teaspoon in a whole bowl of water and a good pat dry.
What are the best apples for dipping?
Any firm, crisp apple works well. Tart apples like Granny Smith balance the sweet caramel; Honeycrisp and Gala are sweeter options.
Can I melt everything in the crock pot instead of the microwave?
Yes. Cover the jars, turn the crock pot on, and stir every so often. Microwaving first is just faster.
Caramel Apple Station
Equipment
- Half-pint mason jars
- Slow Cooker
- Wooden skewers
- Apple slicer
Ingredients
Dipping Sauces
- 1 cup semisweet chocolate chips
- 1 cup white chocolate morsels
- 1 cup butterscotch morsels
- 1 cup caramel bits
- 1 tablespoon heavy cream or milk
- 3 teaspoons vegetable oil divided
Apples
- 2 apples washed
- 1/2 teaspoon salt
- room-temperature water
Toppings
- chopped pecans
- graham cracker crumbs
- toffee bits
- mini chocolate chips
- puffed rice cereal
- shredded coconut
- chocolate or fall sprinkles
Instructions
- Place each dipping sauce ingredient in its own half-pint mason jar.
- Add a splash of oil (about 1 teaspoon) to each jar of chips and a splash of heavy cream to the caramel.
- Microwave two jars at a time in 30-second increments, stirring to the bottom between rounds, until melted, about 1 to 1 1/2 minutes. Watch the caramel closely; it melts fastest. Add another splash of oil to the white chocolate if needed.
- Set the jars in a crock pot on the warm setting to keep them melted.
- Stir the salt into a bowl of room-temperature water. Slice the apples and soak the slices 5 to 10 minutes to prevent browning.
- Place the toppings in small bowls or ramekins.
- Pat the apple slices completely dry and insert a wooden skewer into each.
- Dip slices into the sauces and sprinkle with toppings.
Notes
- Pat the apple slices completely dry so the dips cling.
- The jars can be melted directly in the crock pot instead of the microwave. Just stir often so they don’t harden on the bottom.
3. Fall Muddy Buddies
A treat you can make anytime, this time with candy corn and peanuts for fall.
Prep: 15 minutes
Cook: 2 minutes
Makes: about 12 cups
Ingredients
- 1 1/2 cups semisweet chocolate chips
- 4 tablespoons butter (half a stick), salted
- 3/4 cup peanut butter
- 1 teaspoon vanilla
- Pinch of salt (if using unsalted butter)
- 8 cups Rice Chex cereal (Corn Chex works too)
- 2 cups powdered sugar
- 2 cups dry roasted peanuts
- 1 cup candy corn
Instructions
- Melt the coating. Combine the chocolate chips, butter, and peanut butter in a microwave-safe bowl. Microwave in 30-second increments, stirring between each, until smooth and creamy. (A double boiler on the stovetop works too.)
- Add the vanilla. Stir in 1 teaspoon of vanilla. If you used unsalted butter, add a pinch of salt. It balances all the sweetness.
- Coat the cereal. Measure the cereal into a large bowl. Pour the warm chocolate mixture over it and fold gently with a spatula until it’s all coated. Go easy so you don’t break up the cereal.
- Bag it up. Put 1 cup of powdered sugar in each of two gallon-size zipper bags. Divide the cereal between them, one scoop in one bag, then one in the other. (If you have a large bowl with a lid, you can use that instead.)
- Shake! Close the bags and shake from every direction until the powdered sugar coats everything.
- Add the fall mix-ins. Stir in the peanuts and candy corn.
Tips
- Let the kids do the shaking. They’ll go to town on it.
- Not a candy corn fan? Leave it out. It’s still delicious with just the peanuts. (Where do you stand on candy corn? Let me know in the comments!)
Fall Muddy Buddies FAQ
How much is a pinch of salt?
It’s just what you can pinch between your fingers, about 1/16 of a teaspoon. No need to measure.
How should I store Muddy Buddies?
Keep them in an airtight container at room temperature for up to a week.
Can I make Muddy Buddies without peanut butter?
You can swap in another nut butter or a sunflower seed butter, and skip the peanuts for a nut-free version.
Fall Muddy Buddies
Equipment
- Large mixing bowl
- Gallon-size zipper bags
Ingredients
- 1 1/2 cups semisweet chocolate chips
- 4 tablespoons salted butter
- 3/4 cup peanut butter
- 1 teaspoon vanilla extract
- 1 pinch salt if using unsalted butter
- 8 cups Rice Chex cereal
- 2 cups powdered sugar
- 2 cups dry roasted peanuts
- 1 cup candy corn
Instructions
- Combine the chocolate chips, butter, and peanut butter in a microwave-safe bowl. Microwave in 30-second increments, stirring between each, until smooth.
- Stir in the vanilla (and a pinch of salt if using unsalted butter).
- Place the cereal in a large bowl. Pour the chocolate mixture over it and gently fold until evenly coated.
- Add 1 cup powdered sugar to each of two gallon-size zipper bags. Divide the coated cereal between the bags.
- Seal and shake until well coated.
- Combine in a bowl and stir in the peanuts and candy corn.
Notes
- Fold gently so the cereal doesn’t break.
- Candy corn is optional. Peanuts alone are delicious.
- Store airtight at room temperature up to 1 week.
4. Old-Fashioned Popcorn Balls
The throwback treat. If you got these trick-or-treating as a kid, you know.
Prep: 10 minutes
Cook: 15 to 20 minutes
Makes: about 8 to 12, depending on size
Ingredients
- 7 cups popped popcorn, unsalted and unbuttered
- 1/3 cup water
- 4 tablespoons butter (half a stick), plus softened butter for your hands
- 1 teaspoon salt
- 1 teaspoon vanilla
- 1 cup granulated sugar
- 1/3 cup light corn syrup (dark corn syrup or molasses also work)
Instructions
- Pop the popcorn. Microwave or stovetop, however you normally pop it is perfect. Put the 7 cups in a large bowl with room to stir.
- Start the syrup. In a saucepan, combine the water, butter, salt, vanilla, sugar, and corn syrup.
- Bring it to a boil, gently. Keep your burner no higher than medium. It will come to a rolling boil long before it’s ready, so don’t be fooled.
- Cook to hard ball stage. Cook until it reaches 250°F on a candy thermometer. It takes several minutes. At 220°F it looks like it’s working, but it still slides right off the spoon. By 240°F it coats the spoon better, and at 250°F it coats the back of the spoon well. No thermometer? Drop a little into cold water. If it quickly forms a ball that holds its shape, it’s ready.
- Drizzle and stir. Slowly drizzle the syrup over the popcorn, stirring as you pour. Set the pan down and stir, then pour some more, until every piece is coated.
- Shape the balls. With clean hands, grease them with softened butter, then grab however much popcorn you want and shape it into balls, mini or large. It’s a little hot, so be careful. Re-butter your hands as you go.
- Let them cool. Set the popcorn balls on parchment paper to cool and firm up.
Tips
- Start with plain popcorn. The syrup brings the salt and butter.
- Keep that butter handy. Greased hands make shaping so much easier.
Old-Fashioned Popcorn Balls FAQ
Can I make popcorn balls without a candy thermometer?
Yes. Use the cold water test: drop a bit of syrup into cold water. If it forms a firm little ball quickly, you’ve hit hard ball stage.
Why are my popcorn balls falling apart?
The syrup didn’t get hot enough. It needs to reach 250°F to hold the popcorn together.
Can I use microwave popcorn?
Yes, but choose a plain or lightly salted variety. Butter-flavored popcorn can make the balls greasy.
How do I store popcorn balls?
Once fully cooled, wrap each one in plastic wrap or a treat bag. They’ll keep a few days at room temperature.
Is it safe to hand out homemade popcorn balls on Halloween?
Save homemade goodies for the kids and families you know personally who would be glad to get them from you.
Old-Fashioned Popcorn Balls
Equipment
- Saucepan
- Candy thermometer
- Parchment paper
Ingredients
- 7 cups popped popcorn unsalted and unbuttered
- 1/3 cup water
- 4 tablespoons butter plus softened butter for your hands
- 1 teaspoon salt
- 1 teaspoon vanilla extract
- 1 cup granulated sugar
- 1/3 cup light corn syrup
Instructions
- Place the popped popcorn in a large bowl.
- In a saucepan, combine the water, butter, salt, vanilla, sugar, and corn syrup.
- Bring to a boil over medium heat (no higher).
- Cook to 250°F (hard ball stage) on a candy thermometer, several minutes. Or test by dropping a little syrup into cold water; it should quickly form a firm ball.
- Slowly drizzle the syrup over the popcorn, stirring as you pour, until evenly coated.
- Grease clean hands with softened butter and shape the popcorn into balls of any size. Careful, it’s hot.
- Place on parchment paper to cool completely.
Notes
- Dark corn syrup or molasses can replace the light corn syrup.
- If the balls fall apart, the syrup didn’t reach 250°F.
- Re-butter your hands as needed while shaping.
- Wrap individually once cool; keeps a few days at room temperature.
5. Mummy Hot Dogs
Really simple, and so cute on a party table.
Prep: 15 minutes
Cook: 13 to 17 minutes
Makes: about 8 (one can of dough)
Ingredients
- Hot dogs, any kind you like
- 1 can crescent dough sheet (crescent rolls work too)
- Mustard
Instructions
- Heat the oven to 350°F. Line a baking pan with parchment paper.
- Cut the strips. Unroll the crescent dough sheet and cut thin strips. They don’t have to be perfect; this recipe is very forgiving. (If you use crescent rolls, pinch the seams back together first.)
- Wrap the mummies. Wrap strips around each hot dog, leaving a gap near the top for the face. When you run out of strip, grab another and keep wrapping down to the bottom. It takes about two strips per hot dog, and none of them have to match.
- Bake. Bake 13 to 17 minutes, depending on your oven and how brown you like your crescent dough. Mine took about 14 minutes.
- Add the eyes. Dip the blunt end of a wooden skewer in mustard and dot two eyes in the gap on each mummy.
Tips
- Uneven wrapping looks more like a mummy, so don’t fuss over it.
- Ketchup or a dab of cheese work for eyes too.
Mummy Hot Dogs FAQ
Can I make mummy hot dogs ahead of time?
Wrap them up to a few hours ahead and keep them covered in the fridge, then bake right before the party.
Can I use crescent rolls instead of a dough sheet?
Yes. Pinch the seams together before cutting strips so they don’t pull apart while you wrap.
Why does my mummy hot dog look sad?
Because he misses his mummy. (Darren’s joke, not mine.)
Mummy Hot Dogs
Equipment
- Baking sheet
- Parchment paper
- Wooden skewer
Ingredients
- 8 hot dogs
- 1 can crescent dough sheet 8 oz.
- mustard for eyes
Instructions
- Preheat the oven to 350°F. Line a baking pan with parchment paper.
- Unroll the crescent dough sheet and cut it into thin strips.
- Wrap the strips around each hot dog, leaving a gap near the top for the face. Use about 2 strips per hot dog.
- Place on the prepared pan.
- Bake 13 to 17 minutes, until golden.
- Using the blunt end of a wooden skewer, dot two mustard eyes in the gap on each mummy.
Notes
- If using crescent rolls, pinch the seams together before cutting strips.
- The wrapping doesn’t need to be neat. Uneven looks more like a mummy.
The Full Halloween Spread
Set them all out together and you’re ready for a party: spooky eyes, the caramel apple station, fall Muddy Buddies, mummy hot dogs, and those old-fashioned popcorn balls. If you want a real throwback, make the popcorn balls and hand them out to the kids you know when they come around trick-or-treating.
I hope this gives you some fun ideas to try in your kitchen with your kids or grandkids. This one was a little different, but I hope it inspires you to get in the kitchen and just have some fun.
Looking for more fall favorites? Try my Pumpkin Crunch Cake, my Old Fashioned Apple Dapple Cake, and my Graham Cracker Toffee Bars.
Thank you so much for joining me at Mary Katherine’s Table. And remember to go out today and find somebody who needs a little bit of kindness and give them some of yours.
💌 From Your Kitchen to Ours
One of my favorite things about this channel is hearing from you. From time to time, we feature viewer-submitted recipes, the tried-and-true dishes you’ve cooked for years and love to share. If you have a favorite family recipe you think belongs at Mary Katherine’s Table, I’d love to see it. Your recipe may be featured in a future From Your Kitchen to Ours video!
👉 Submit your recipe here



These are really good MK , just for fun, we tried a few with mini peanut butter cups also because they are the same size and hey….why not lol… They turned out great also and if you are a PB lover , give it a try .. Thanks !!!
Oh, perfect! Nice to have that option too. 🙂